Call Today 832-494-8205
For Your Free Quote
How to File an Appeal with the IRS
Yes, you can start a dialogue with the IRS if you feel that its findings are incorrect.
The very thought of having to communicate with the Internal Revenue Service about something you believe is an agency error is intimidating to most people. The tax code is massive and often difficult to decipher, and everyone gets at least a little nervous they consider engaging the governing agency.
 But there are numerous reasons why you might dispute something that the IRS has communicated to you. You might think, for example, that the law was not interpreted correctly, so a decision may not have been the right one. Or you don’t believe that a collections effort should have been initiated against you, or you feel that your offer in compromise should have been accepted.
There are three things you need to do first:
- Double- and triple-check any IRS publications that you consulted to make sure you read them correctly, as well as to be sure that you’re very clear on what your position is and why.
- Decide whether you are going to go it alone or whether you would like a CPA or attorney to represent you.
- Prepare to file a written protest to request an Appeals conference.
Note: You may be able to bypass this formal document if you qualify for something like the Small Case Request. Check with us to see which procedure will be appropriate in your case.
Even if you choose to let us guide you through this complex process, you can start gathering information for the written protest. The IRS expects it to contain a great deal of detail, including:
 Your contact information,
- A clear statement indicating that you intend to appeal to the Office of Appeals because of changes that the agency suggested,
- The letter that the IRS sent you that outlined the changes it believed needed to be made,
- The pertinent tax period(s) or year(s),
- A list of the items with which you take exception,
- Your rationale for disagreeing, including supporting facts,
- Your signature, of course, and
- A statement and signature from any professional who helped you prepare the protest document.
Talk to us if you’re protesting a lien, levy, seizure, or denial or termination of an installment agreement. These disagreements require a different procedure.
Be Proactive
You may assume that the IRS is always right and therefore may be uncomfortable second-guessing the changes the agency made to your tax return. But you have a perfect right to protest – as long as you’re certain of the rationale for your dispute.
The best way to avoid having to go through this process, of course, is to be exceptionally careful about your tax return in the first place. This requires planning throughout the year and a thorough understanding of all of the information you supply to the IRS. If your return contains more than some simple income and deductions, we’d be happy to work with you from start to finish.
An Introduction to the QuickBooks Online Customer Page
Your customers are the heartbeat of your business. QuickBooks Online helps you keep them happy.
Do you remember how you used to keep track of information about your customers before you started using a computer for your accounting? A file folder containing paper transaction forms and other communications? A card in your Rolodex? A list on paper?
It’s hard to imagine going back to those days once you start using QuickBooks Online. The site provides detailed record forms for your customers. It also offers multiple ways to get a snapshot of their current status with you. And there are numerous paths you can take to create sales forms for them.
Besides helping you complete the work you must do with each customer, all of these tools can help you achieve a key goal for your business: exceptional customer relationships. Here’s a look at what you can do to build those relationships.
A Central Clearinghouse
The easiest way to find these tools is to simply click the Customers tab in the navigation pane. This will take you to a comprehensive page that will eventually contain a list of your customers. To add a new customer, click New Customer in the upper right corner.
Note: If you already have a database of customers in an Excel or .csv format, you should be able to import it into QuickBooks Online. We can help you make this happen.
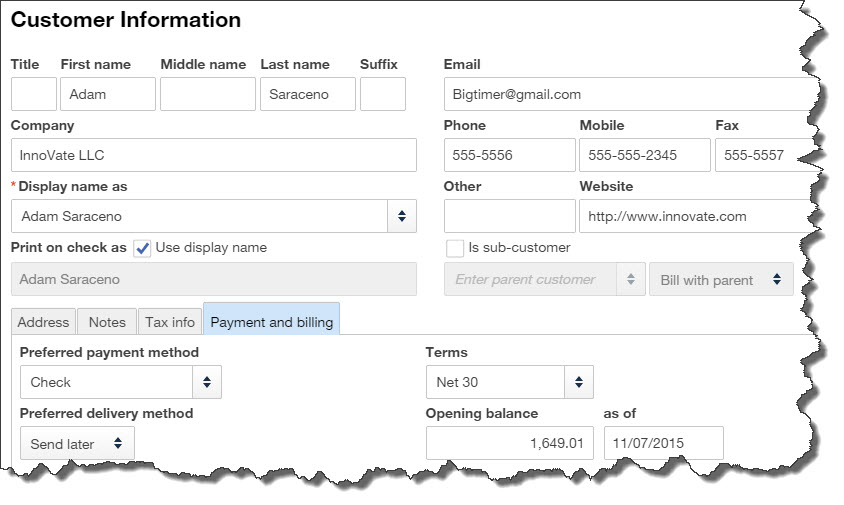
Figure 1: QuickBooks Online helps you create thorough profiles for each of your customers.
You’ll see an empty screen with predefined fields like the one above. Complete as many fields as possible can for your customer; you’ll be using this information later in transactions and reports.
When you’ve finished, look in the lower left corner, where you’ll see four tabs. You can use the blank screen that opens when you click Notes to enter miscellaneous information. Click on Tax info to supply a Tax Resale No. and select a Default Sales and Use Tax Rate. If you need to set up sales tax and haven’t yet, we can work with you on that.
Completing the fields in the screen under the fourth tab, Payment and billing, will save you a lot of time when you start creating transactions. Any of the customer’s current, unpaid obligations should be entered in the field labeled Opening balance…as of. You can also select default (preferred) Terms, payment method (cash? check? credit card?), and delivery method (print or send later).
If you haven’t yet signed up for a merchant account, which lets you accept credit/debit cards and bank transfers, let us tell you what’s involved. You’ll find that invoices are paid faster if a customer can do so electronically.
Viewing and Acting
Once you’ve entered information for one or more customers, their names and some additional details will appear in the list that’s displayed when you click on Customers. You’ll see a horizontal colored bar at the top of the screen; this updates you on the status of your sales transactions. Below that is your table of customers.

Figure 2: You can do more than simply access information about each customer from the master page; you can also launch activity and transaction forms.
Select a group of customers and click the arrow next to Batch actions, and you’ll be able to send emails or create statements for them. When you’ve created records for multiple customers, the search box will come in handy.
Your list can also contain columns for each customer’s email and address; you’d make this change by clicking on the gear icon in the upper right corner. And when you click on the arrow next to Receive payment in the far right column, a drop-down list will display the other activities you can do from there, like creating invoices and sending reminders.
Critical Care Required
Keep your customer records updated whenever there’s a change. You want every detail of your communications with your customers to be correct — down to the spelling of their street names. Seemingly little things like this can have impact on your customers’ perception of their value to you.
Why You Might Get a Letter from the IRS, and What to Do
Don’t panic: It isn’t necessarily bad news. But you may need to deal with it.
Getting a letter actually addressed to you personally is becoming a thing of the past, what with email and social media taking over a lot of our correspondence.
 But a letter addressed to you from the IRS? Your first reaction may well be to wonder what you did wrong.
The IRS doesn’t always deliver bad news by mail. The agency may want to inform you that you have a larger refund than you expected. Or that it simply needs some additional information or some extra time (if the processing of your return is delayed). Sometimes, you don’t have to take action on the notice.
But sometimes you do. The IRS will send you a letter through the U.S. Mail if:
- You owe more than you submitted,
- You need to answer a query about your return, or
- You must verify your identity or provide more information.
If you get a message that claims to be from the IRS in email or on social media, it’s not. The agency only communicates with taxpayers via U.S. Mail. Go to this page to see how to report the fraudulent note.
Letters from the IRS, though, need to be responded to quickly. If you are given a deadline, you must answer within that timeframe. If you don’t, you may incur additional interest and penalty charges. You may also put your right to appeal in jeopardy.
Money you owe needs to be submitted as soon as possible. If you absolutely can’t pay in full, at least pay what you can. Payments can be made online. You can also request an Online Payment Agreement or Offer in Compromise. We can tell you more about these options.
Here are some other tips from the IRS:
 Read through the entire letter at least once and make sure you understand what is being said. Let us know if you are at all unsure of the situation. Your return may have been changed by the IRS, in which case you should compare the modifications to your original return. The agency may also believe that the return was submitted fraudulently and not by you. You’ll be asked to verify your identity if identity theft is suspected.
Contact the IRS immediately if you don’t agree with its findings or if you have questions. There should be a phone number in the upper right-hand corner of the letter. Before you call, gather together your return and any other documents that relate to it. You can also respond in a letter of your own, but know that it can take at least 30 days to get a response from the agency.
Of course, you will also be contacted by the IRS through the U.S. Mail if you’ve been selected for an audit. Again, this doesn’t mean that the agency suspects that there are errors in your tax return. Some taxpayers are selected randomly. You don’t want to go through an audit alone. We have dealt with the IRS and know how this process will work, and can assist you throughout.
So whether you get an audit notice from the IRS or any other kind of correspondence that concerns you, let us help.
Working with Employee Records in QuickBooks Online
Payroll requires countless details about each employee. QuickBooks Online will walk you through the process of entering them.
If you’ve only been on the receiving end of a paycheck, you may not know just how much prep work went into your neatly-organized paystubs. Those official-looking columns of numbers that described how much you earned and how much was taken out – and for what purpose – were the result of a tremendous amount of data entry when you were hired.
Now it’s your turn to discover how complex that recordkeeping task is. QuickBooks Online was designed for small businesspeople who weren’t schooled in the intricacies of double-entry accounting, so it simplifies the process of preparing for payroll as much as possible. Still, it will probably be the most challenging element of your web-based bookkeeping.
We can help you navigate these sometimes-choppy waters so that you’ll be ready to run your payroll with confidence. Here’s an overview, though, of one of the most critical steps: creating employee records comprehensively and accurately.
Just the Facts
The left vertical toolbar in QuickBooks Online contains a link for Employees. This is where you’ll add and edit staff records. Once you’re set up and have begun running payrolls, the page that this link opens will display your current year’s payroll cost totals. There will also be a list of employees and their pay rates and payment methods; you’ll be able to click on their entries to view and edit their record details.
To get started, though, you’ll click on Add Employee. This opens a page that asks for the individual’s:
- Full name,
- Withholdings (you’ll enter W-4 information here),
- Pay frequency,
- Pay type and amount (multiple options are available here besides salary and hourly),
- Deductions (retirement, health care, etc.), and
- Pay method (check or direct deposit).
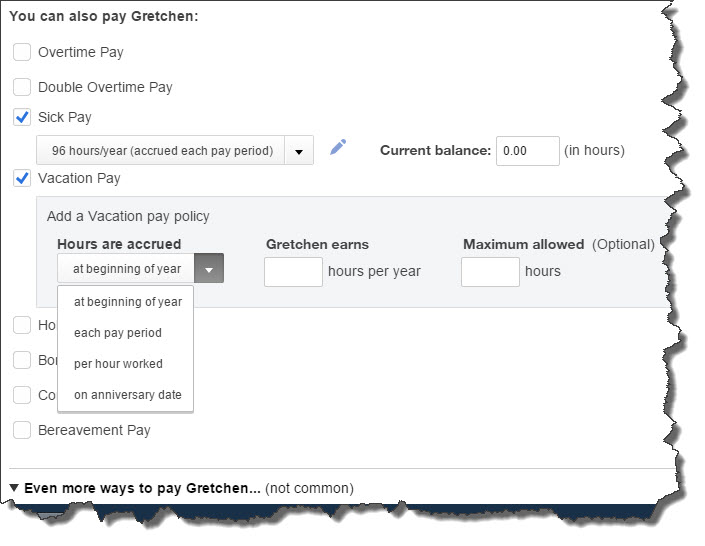
Figure 1: QuickBooks Online and its payroll component contain many screens like this that employ common data entry conventions. The mechanics are easy, but 100 percent accuracy is required.
Some of these requests for information have a small pencil icon next to them. This means that there are additional screens where you can provide the needed details. In the example above, you’re defining pay types that will be available to the employee, like sick pay and vacation pay.
Depending on your company’s benefits, entering deduction information may be the most detailed and time-consuming task. QuickBooks Online first lets you choose between entering a deduction/contribution or garnishment. If it’s health insurance, for example, you’ll have to indicate how much money will be deducted from employees’ earnings each pay period (in dollars or a percentage) and what the company-paid contribution will be (if any). If there’s an annual maximum, you’ll also enter it here, and you’ll indicate whether the premium amount is taxable or pre-tax.
A sample check is displayed in the right column of this page. As you enter information, the check will be filled in with the correct amounts. If you don’t have a particular detail at hand, you can save what you’ve done and come back later to finish the record. And you can always return to edit data you’ve supplied.
When you’ve completed all of this and clicked Done, you’ll be back at the Employees screen. Click on the name of the staff person whose records you just created, and you’ll see something like this:
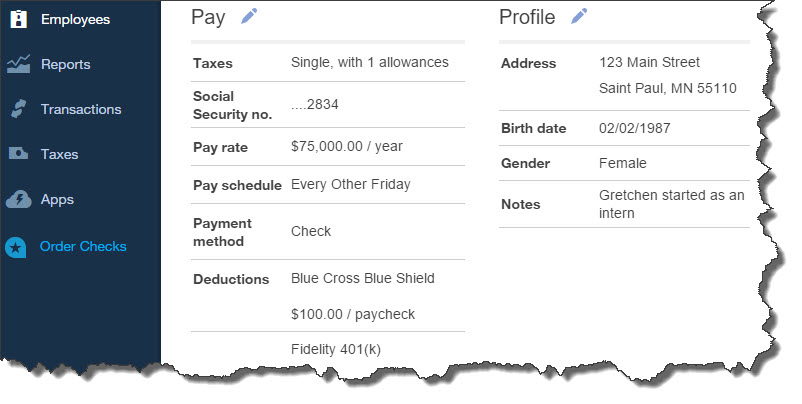
Figure 2: Once you’ve created an employee’s record, you can view all of its details and edit it as needed.
There will undoubtedly be times when you’ll want to see your employee data in report form rather than clicking through numerous individual records. QuickBooks Online offers several report templates that accommodate this. You’ll click on Reports in the left vertical toolbar, and then All Reports | Manage Payroll. The most relevant here in terms of viewing employee-related information are:
- Vacation and Sick Leave,
- Employee Details,
- Payroll Deductions/Contributions,
- Workers’ Compensation, and
- Employee Directory.
Running your first payroll can be daunting. We hope you’ll let us help you prepare for it.
How to File an Amended Tax Return
Oops! Did you determine that you made an error on an income tax return that you already filed? It’s not unusual. That’s why the IRS has a special form that will fix it.
Maybe a 1099 that you had forgotten about came in after you’d filed your income taxes for the previous year. Or a big business deduction slipped your mind. Or as you glanced through your return before filing it, you noticed that one digit in your Social Security number was incorrect.
Sometimes, post-filing errors are your own fault and sometimes not. Whatever the reason, you should file an amended return as soon as you discover the error, because it takes some time to get it processed. The IRS recommends you file a Form 1040X when you need to register a change – or changes — in your filing status, income, deductions, or credits.
Note: Keep in mind that there are exceptions to the general rules and additional forms that may be required depending on your situation. Also, there are some errors that, for numerous reasons, don’t warrant an amended return. So please talk to us before you file one.
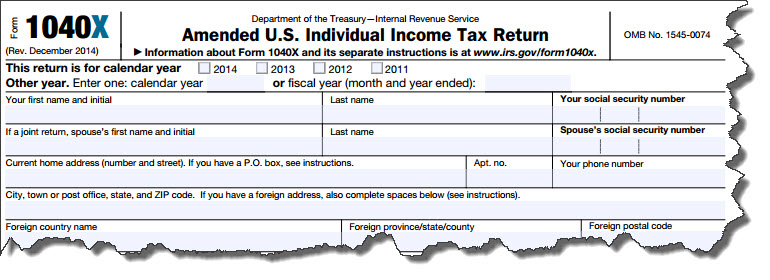
Figure 1: You’ll need to file an IRS Form 1040X to correct a Form 1040, 1040A, 1040EZ, 1040NR, or 1040NR-EZ.
Though we strongly urge you to let us help you prepare and submit an amended return, here are answers to some questions you may have about the process.
What’s Needed: If you need to file an amended return, you’ll have to get a paper copy of the IRS Form 1040X. Besides the form itself and IRS instructions, you’ll need your original return and all of its supporting forms, schedules, worksheets, and instructions.
Where It Goes: Even if you originally filed electronically, you’ll have to complete and submit this the old-fashioned way: through the U.S. Mail. (See page 12 of the IRS instructions for this form to find the appropriate mailing address). Note: If you have discovered errors in more than one year, you’ll have to submit separate 1040X forms in separate envelopes.
How Long You Have to Submit It: The IRS wants to see your 1040X within three years of the date that your original form was filed (including extensions) or within two years of actually paying the tax – whichever date is later.
How Long It Takes the IRS to Process Your 1040X: It may not even show up in the IRS’ system for three weeks. Expect to wait up to 16 weeks for the change to be completed.
How You Can Check the Status of a 1040X: The IRS provides an online tool called Where’s My Amended Return? , which only has updates on certain types of amended returns. You can also call an automated toll-free number (866-464-2050).
What the IRS Does If It Has Questions About Your 1040X: It will contact you through the U.S. Mail.

Figure 2: The IRS Form 1040X is structured differently from the other forms in the 1040 family. It will actually replace your original return.
The Form 1040X is not as lengthy as the 1040, but it in essence becomes your new tax return for the year. You’ll supply your original entry or any adjustment that the IRS has already made in one column and then the new amount in another, with the difference in between.
Keep in mind that an amended federal form may have an impact on your state return. We can help you determine this and advise you on how to proceed.
You know how important it is to get everything right on your income tax return. Accuracy is just as critical – if not more so – when you file an amended return. You don’t want to have to correct your corrections, and we don’t want you to, either. So let us know if it looks like a Form 1040X is in your future.

