Archive for the ‘Newsletter’ Category:

An Introduction to the QuickBooks Online Customer Page

Your customers are the heartbeat of your business. QuickBooks Online helps you keep them happy.

Do you remember how you used to keep track of information about your customers before you started using a computer for your accounting? A file folder containing paper transaction forms and other communications? A card in your Rolodex? A list on paper?

It’s hard to imagine going back to those days once you start using QuickBooks Online. The site provides detailed record forms for your customers. It also offers multiple ways to get a snapshot of their current status with you. And there are numerous paths you can take to create sales forms for them.

Besides helping you complete the work you must do with each customer, all of these tools can help you achieve a key goal for your business: exceptional customer relationships. Here’s a look at what you can do to build those relationships.

A Central Clearinghouse

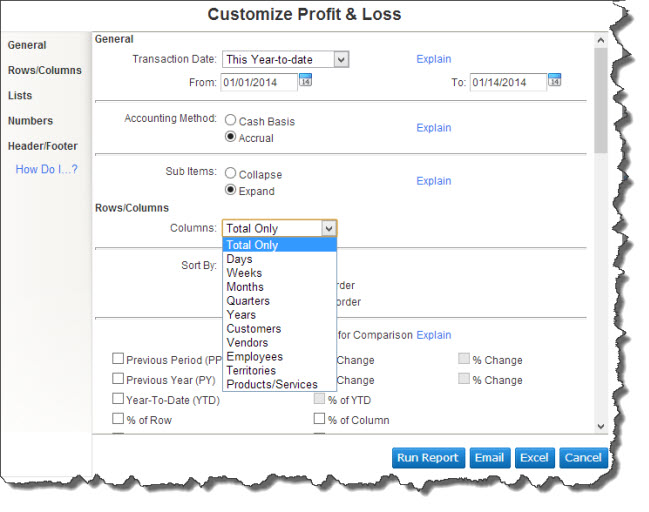
The easiest way to find these tools is to simply click the Customers tab in the navigation pane. This will take you to a comprehensive page that will eventually contain a list of your customers. To add a new customer, click New Customer in the upper right corner.

Note: If you already have a database of customers in an Excel or .csv format, you should be able to import it into QuickBooks Online. We can help you make this happen.

QBO 1215 image 1

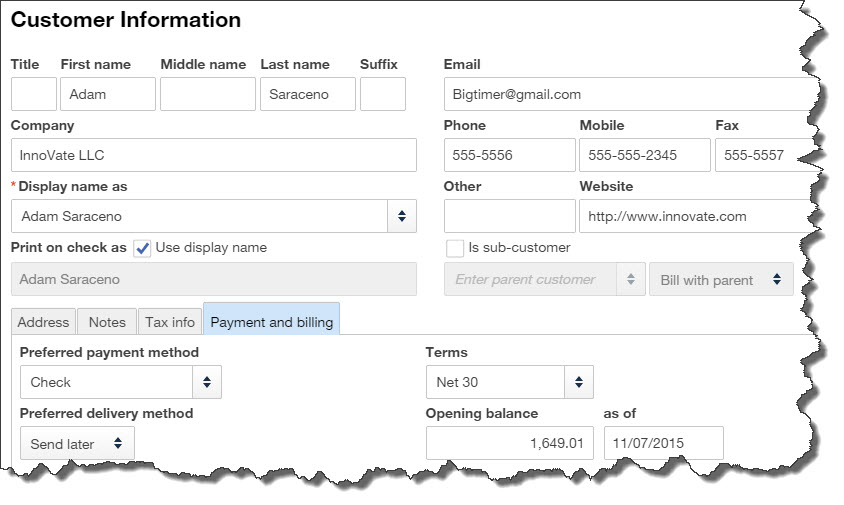
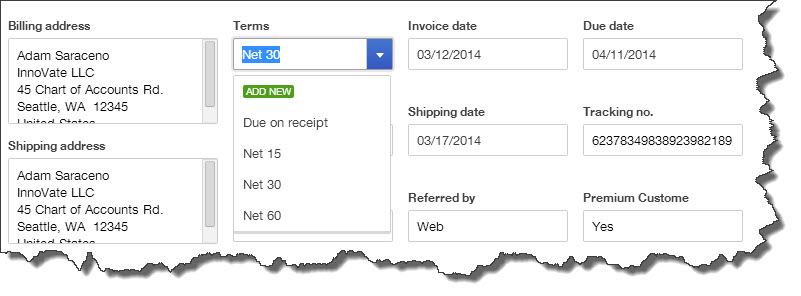
Figure 1: QuickBooks Online helps you create thorough profiles for each of your customers.

You’ll see an empty screen with predefined fields like the one above. Complete as many fields as possible can for your customer; you’ll be using this information later in transactions and reports.

When you’ve finished, look in the lower left corner, where you’ll see four tabs. You can use the blank screen that opens when you click Notes to enter miscellaneous information. Click on Tax info to supply a Tax Resale No. and select a Default Sales and Use Tax Rate. If you need to set up sales tax and haven’t yet, we can work with you on that.

Completing the fields in the screen under the fourth tab, Payment and billing, will save you a lot of time when you start creating transactions. Any of the customer’s current, unpaid obligations should be entered in the field labeled Opening balance…as of. You can also select default (preferred) Terms, payment method (cash? check? credit card?), and delivery method (print or send later).

If you haven’t yet signed up for a merchant account, which lets you accept credit/debit cards and bank transfers, let us tell you what’s involved. You’ll find that invoices are paid faster if a customer can do so electronically.

Viewing and Acting

Once you’ve entered information for one or more customers, their names and some additional details will appear in the list that’s displayed when you click on Customers. You’ll see a horizontal colored bar at the top of the screen; this updates you on the status of your sales transactions. Below that is your table of customers.

QBO 1215 image 2

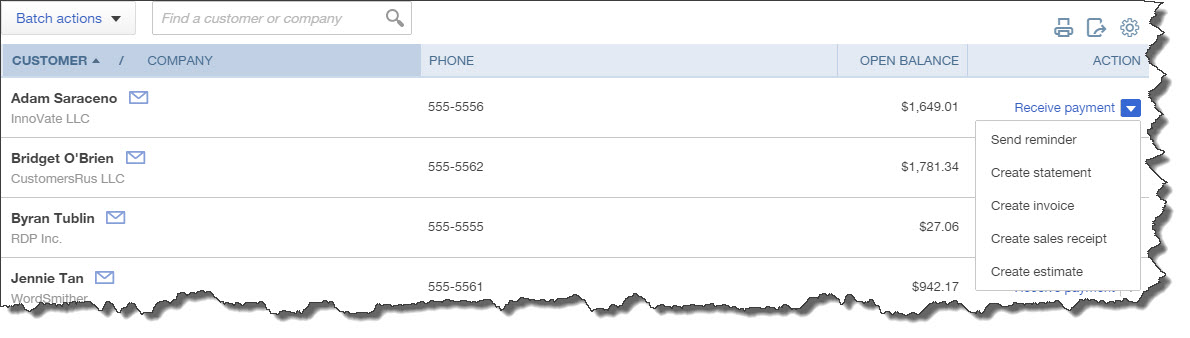
Figure 2: You can do more than simply access information about each customer from the master page; you can also launch activity and transaction forms.

Select a group of customers and click the arrow next to Batch actions, and you’ll be able to send emails or create statements for them. When you’ve created records for multiple customers, the search box will come in handy.

Your list can also contain columns for each customer’s email and address; you’d make this change by clicking on the gear icon in the upper right corner. And when you click on the arrow next to Receive payment in the far right column, a drop-down list will display the other activities you can do from there, like creating invoices and sending reminders.

Critical Care Required

Keep your customer records updated whenever there’s a change. You want every detail of your communications with your customers to be correct — down to the spelling of their street names. Seemingly little things like this can have impact on your customers’ perception of their value to you.

Archive for the ‘Newsletter’ Category:

An Introduction to the QuickBooks Online Customer Page

We’ll finish what we started last month: a walk through some of your most important Company Settings in QuickBooks Online Plus.

As we said last month, QuickBooks Online is designed to work for a tremendously wide variety of business types. Each, of course, has its own workflow and functionality needs. So the site comes with a number of preset defaults, settings that are commonly active in many companies.

You can change these, of course. Click the little gear icon in the upper right corner of the screen and select Company Settings.

We went through several of these last month, ending in the middle of the Sales Form Entry section. The remainder of this category deals with your options regarding:

  • Service Dates. Do you want a separate field that will distinguish this from other dates on the sales form?
  • Shipping. Do you want invoices, etc., to contain separate fields for this information? Ask us if you’re not sure which account should be used.

QBO 0414 image 1

Figure 1: The answers you supply in Company Settings will help shape QuickBooks Online to meet your specific needs. Default data can be changed on the fly.


  • Terms. The default is Net 30, but you can select from other options.
  • Automatically apply credits. Should your invoices automatically apply existing customer credits?

The Form Delivery area of Company Settings covers a lot of ground. The first issue is major: Customize forms. QuickBooks Online contains tools that let you change the look and content of your sales forms, like their titles, column headings, your own contact information and visuals like fonts, text size and colors. You can also change the Delivery method default (print, email or none) and edit the standard message that appears in emailed sales forms.

You can choose to Email a link to view and pay invoice online (merchant account required for customers to submit online payments) and dispatch emailed sales forms as PDF, HTML or plain text. And you can accept or modify the defaults for customer statements.

QBO 0414 image 2

Figure 2: You can specify how you would like customer statement information to appear by changing these Company Settings.

The next section begins with an innovative tool, Invoice Automation, that should be used with caution. This allows QuickBooks Online to create invoices for all customers with unbilled activity on a schedule that you specify. You have four options here:

  • Pass
  • Request reminders that invoices are waiting
  • Let QuickBooks Online create the invoices, but notify you, or
  • Let QuickBooks Online create the invoices without telling you.

If you choose the fourth option, let us work with you on invoice automation. You could end up having scrambled books, poor cash flow and/or confused customers if this isn’t handled properly.

Vendors & Purchases is up next. You’ll specify your preferences here like billable expenses, markups, terms and automatically-applied bill payments (the latter can be tricky; please let us help here). You’ll also spell out any need for custom fields and custom transaction numbers in purchase orders.

QBO 0414 image 3

Figure 3: This section is totally optional, but it may be helpful if you want more ways to define and track your vendors by creating custom fields and custom transaction numbers.

Do you plan to use Time Tracking? You’ll first have to indicate whether you sell services and bill customers for time. Do you want your employees and subcontractors to see the rates you’re billing customers? If there’s a significant difference, you may not.

The final entries in Company Settings are minor housekeeping questions, with the exception of the reference to Payroll. You’ll have to click over to another section to manage this more complicated setup, and you’ll probably want our assistance with this.

The mechanics of establishing your company preferences are easy; you simply check or uncheck boxes and fill in fields. And the defaults can be changed at any time (for future activity).

But these are critical decisions that you’re making here. If you’re new to QuickBooks applications, some training will be in order. If you’ve been using QuickBooks Online for some time, it’s worth revisiting your Company Settings. You may find that your accounting solution is more flexible than you thought.

Archive for the ‘Newsletter’ Category:

An Introduction to the QuickBooks Online Customer Page

Be prepared for a mountain of paperwork, much of it related to income taxes.

Adding your first employee to your small business comes with good and bad news. The good, of course, is that you’re succeeding so well that you need full-time help. You’re hopeful that this new individual will being new energy and fresh ideas into your growing company.

You probably worry, though, about finding the right person. And you wonder how much your own workload as an employer will grow.

You’re smart to be concerned about both issues. The first has a lot of gray area, but the second – at least where company income taxes are concerned – is very straightforward and clear. The IRS spells out your responsibilities and expects that they will be followed to the letter.

Here’s some of what you’ll need to do:

Get an Employer Identification Number (EIN). Sometimes called Employer Tax ID or Form SS-4. You’ll use this for your interaction with the IRS and with state agencies.

 TaxTips 0414 image 1

Figure 1: Your Employee Identification Number is as critical to your business life as your Social Security number is to your personal life.

Set up your accounting system to accommodate withholding taxes. If you’re using QuickBooks, this is fairly easy. But it can be risky to modify the Chart of Accounts unless you’re absolutely sure of what you’re doing. Let us help you with this initial setup. You’ll need federal and state (if applicable) income tax withholding accounts. You’ll use these in much of your payroll work, like financial statements and expense-tracking.

Ask your new hire to complete the required IRS forms. Your employee must also fill out a W-4 form, which you’ll then submit to the IRS. This will guide you in withholding the correct amount of tax from the employee’s paycheck. The I-9 form must also be completed by every new hire; it verifies their citizenship or eligibility to work in the U.S.

Register the employee with your state’s New Hire Reporting Program. Newly-hired or re-hired employees must be reported to the state within 20 days of their hire date.

File your quarterly tax returns. If your employees have a portion of their pay withheld for income taxes, Social Security and Medicare taxes, you must file a quarterly Form 941. There are other IRS forms in the 94x series; we can help you determine what you need to file – and how to file.

 TaxTips 0414 image 2

Figure 2: It’s very important that you fulfill your payroll tax responsibilities four times a year. The IRS assesses penalties for not doing so.

Of course, you’ll have other regularly-scheduled tasks to complete related to the IRS and any required state and local taxes. If you have never hired an employee before (and even if you have), let us sit down with you and go over everything. We can put together a calendar outlining what’s due, and when.

Don’t get discouraged. The early setup can be time-consuming and labor-intensive, but if you build the right foundation, you’ll eventually fall into the rhythm of being an employer.

Archive for the ‘Newsletter’ Category:

An Introduction to the QuickBooks Online Customer Page

Not sure you’ll be prepared to file and pay your total taxes due by April 15? Here’s what you need to know about filing an extension.

Sometimes, things beyond your control keep you from making that April 15 income tax filing deadline. Family emergencies. Too much time traveling for work. An overly complicated financial situation. Missing – required – forms from third parties.

TaxTips 0314 image 1


Even though tax filing season is 2-1/2 months long, sometimes you’re just not ready. The IRS makes allowances for this by offering a six-month extension period. If you think you’re going to miss that mid-April milestone for the 2013 tax year, you should know that:

Anyone can file for an extension. If you’re a U.S. taxpayer, you’re eligible to file for what the IRS calls an “automatic” extension. The agency does not require an explanation for your request.

The IRS still wants you to pay your anticipated tax obligation by April 15. As the agency states on the required form, Although you are not required to make a payment of the tax you estimate as due, Form 4868 does not extend the time to pay taxes.

TaxTips 0314 image 2


Does this mean that you absolutely must submit all of the money owed by April 15? Again, in the words of the Internal Revenue Service, Your extension will be automatically processed when you pay part or all of your estimated income tax electronically.

We recommend that you pay all of what you anticipate owing if at all possible, but at least submit as much as you possibly can.

The IRS charges interest on late payments made via an extension. You’ll pay interest on any unpaid tax amount until you pay in full.

The IRS will assess a late payment penalty for every month or part of a month past April 15, 2014 that total tax remains unpaid. Generally, the charge runs one-half to one percent of your taxes due (except for any estimated tax you paid). Max is 25 percent.

You can ask that the late payment penalty be waived because of your circumstances. If you think that you have a good reason for the penalty to be excused, attach a written explanation to your 1040 when you submit it. In order to be considered for penalty forgiveness, the IRS requires that you’ve paid at least 90 percent of your 2013 tax liability by April 15, 2014. These funds can come in through withholding or estimated payments, and/or they can accompany the Form 4868.

TaxTips 0314 image 3


You may also be given a penalty for filing late. Late filing penalties are usually charged when a return is filed after the due date (including extensions). The IRS normally calculates it as 5 percent of the amount owed for every full or partial month. Max is 25 percent. Here, too, the IRS may waive the fee if you attach a statement explaining the reason for your tardiness.

There are three ways to file a Form 4868 (the form required when you request an extension). You can:

  • File the Form 4868 using the Electronic Federal Tax Payment System (EFTPS), and submit the entire amount due or a portion of it. You can also use a credit or debit card.
  • E-file the Form 4868, or
  • Use the official IRS Form 4868 paper form.

Sometimes, a late tax return is unavoidable, and it’s worth paying the extra fees to make sure that your return is correct. But if you find yourself making a practice of filing extensions because you either wait too long to pull together your financial documents or you can’t pay the full amount on time given the amount of your obligation, talk to us about year-round tax planning. April 15 doesn’t have to be a day to dread.

Archive for the ‘Newsletter’ Category:

An Introduction to the QuickBooks Online Customer Page

If you’ve started using QuickBooks Online Plus and think something is missing, check your Company Settings. New users should do this first.

QuickBooks solutions are built to appeal to a wide variety of small businesses. But they’re also very customizable, which means that you can turn features on and off, specify default settings, change the layout and design of forms, and basically set it up so it seems like it was made just for you.

Let’s look at how this works in QuickBooks Online Plus. This cloud-based solution is easy enough to use that if you understand basic accounting concepts, you can jump in and start doing your bookkeeping. If you don’t understand basic accounting concepts, we can go through the setup procedure so you understand QuickBooks Online’s individual elements and how they work together.

If you do just dive in, at some point you’re likely to run up against something that’s missing, or doesn’t work the way you need it to. That’s why you need to look at QuickBooks Online’s Company Settings. You’ll find them by clicking on the little gear icon in the upper right corner and selecting Company Settings.

QBO 0314 image 1

Figure 1: This window opens when you click on Company Settings. It’s good to do much of your setup here before you get started, but you can always revisit it.

Many decisions

If you haven’t already done so, start at the top of the vertical pane and complete the blank fields in the Company Contact Info and Company sections.

Here are the other areas that you should visit as early on in your work as is possible.

Categories. Do you want to be able to assign transactions to Departments, Locations, Territories, etc.? You can use Territory Tracking to do so, but you can only select one of those designations to use throughout QuickBooks Online. If you choose Division, for example, you’ll create a list of options for that field in transactions, like Sales, Marketing, Accounting, etc.

But you can also categorize income and expenses using Class Tracking. This is especially useful at report time. QuickBooks Online lets you create multiple Classes and assign different ones to individual lines in the same transactions. So while each transaction can only have one designated territory, it may represent many classes.

This distinction can be confusing. In addition, it’s important that you create the best Territory and Class Tracking schemes for your purposes. Let us help.

Products and Services. If you buy and/or sell products and/or services, you need to make sure these boxes are checked. The next two boxes should also be checked if you want to track the Quantity and Price Rate and Quantity on Hand (Inventory tracking).

QBO 0314 image 2

Figure 2: If you want to include Quantity and Price Rate on sales forms, you must specify this in Company Settings.

!!Note: Unless boxes are checked in front of QuickBooks Online features, you will not see them as you’re working on the site.!!

Company Logo. Easy. Simply upload the file that contains your company logo so that it will appear on forms.

Custom fields. QuickBooks Online comes with a pre-defined set of fields in forms and transactions that are commonly used by many types of business. But it lets you add your own to meet the needs of your specific company. These fields will appear on invoices, sales receipts, refund receipts and credit memos. Put a check in the box at the beginning of each line, enter the labels for your new fields and designate their order of appearance (1, 2, 3). They will appear to the right at the top of your forms.

QBO 0314 image 3

Figure 3: Customize your sales forms by adding extra fields that your business needs.

Custom transaction numbers. QuickBooks Online auto-assigns numbers, but allows you to set up your own, more descriptive numbering scheme that can include letters.

Deposits. Does your company allow deposits? Check the box and QuickBooks Online will add a field to your invoices.

Discounts. If you offer flat rate and percentage discounts to customers, check this box and select the account where they should be recorded. Discounts given is the default, but you can change this – even for individual transactions.

Estimates billing method. Click the appropriate button to indicate whether you want Accepted or Pending or just Accepted estimate charges to appear on invoices, or not at all. You can also create a boilerplate message that will appear on estimates only and one for sales forms. These can be altered for individual transactions.

You’re not done yet. We’ll explore other Company Settings next month.

Archive for the ‘Newsletter’ Category:

An Introduction to the QuickBooks Online Customer Page

Feeling generous? Want to give a gift of cash or something equivalent to a family member or friend? You should understand the tax implications.

There are numerous reasons why you might want to give a gift to someone you know. Maybe a family member has gone through some hard times, or a friend’s child needs help with school tuition. Or you’ve come into something of a windfall and just want to share the wealth.

The IRS has very clear rules about the tax implications of gifting. So before you bestow a part of what you own to someone, check with us to make sure you understand when taxes might be due.

What about small gifts?

Tax Tips 0214 image 1

You don’t have to worry about the hundred-dollar bills that you tuck into holiday or birthday cards, though the IRS considers any gift to be taxable.

The agency defines “gift tax” as applicable when you give something to another person without the expectation that you’ll be getting something at least equal in value in return. These “somethings,” according to the IRS, can be:

  • Tangible or intangible property, which includes money
  • The use of property, or
  • The right to receive income from property.

The IRS may also assess a gift tax in situations where you sell something for a price that is less than its value, or if you offer someone a reduced-interest or interest-free loan.

If all gifts are taxable, why have I never had to pay a gift tax?

Tax Tips 0214 image 2

There are many exceptions, including gifts that go to:

  • Your spouse
  • A political organization for its use, and
  • Charitable contributions.

If you send money to an educational institution for someone else’s tuition or to a medical facility for expenses incurred by another individual, you do not have to pay gift tax.

The most common scenario involves the outright gifting of cash to someone other than a spouse. These gifts are only taxed if they consist of an amount that’s greater than the annual exclusion for the calendar year. Which means you can give away up to $14,000 to as many people as you want for the 2014 tax year without being taxed.

What happens if you give more?

If you, for example, give your adult son $30,000 because he’s buying a house and you want to help with the down payment, the first $14,000 of that is not taxed, thanks to the annual exclusion.

And the remaining $16,000? That may or may not be taxed, depending on something called the “applicable credit.” We can help you calculate in a situation like this. Even if no gift tax is due here, though, you will have to file a gift tax return. There are other scenarios where this would also be required.

You can be generous without being taxed. But be sure you know exactly where the lines are drawn.


Archive for the ‘Newsletter’ Category:

An Introduction to the QuickBooks Online Customer Page

The smartest business decisions result from customizing and creating frequent reports in QuickBooks Online.

Day after day, you build your company file in QuickBooks Online. You create invoices and purchase orders. Record payments and complete contact and item records. Process payroll and submit payroll taxes. Receive inventory and pay bills and nurture relationships with customers and vendors.

Your labors are rewarded when it comes time to use QuickBooks Online’s reporting tools. If you’ve been conscientious as you move through your daily accounting workflow, the reports that you can generate from this comprehensive compendium of data will arm you with the financial insight and analysis you need as you make critical decisions about the future of your company.

Assembling the precise slices of data you need would be difficult-to-impossible without QBO’s automated reporting tools. Its combination of pre-built templates and generous customization tools let you drill down on just the information you need.

 QBO 0214 image 1

Figure 1: QuickBooks Online makes it easy to find frequently-accessed reports quickly.

Click on the Reports tab. QuickBooks Online gives you fast access to commonly-used reports like Profit & Loss, Balance Sheet and Customer Balance Detail. Memorized Reports are those you’ve already customized and saved, and the Company Snapshot displays multiple charts that contain key financial data, a one-stop shop for your company’s current status.

The Scorecard (Trends) compares your cash flow, sales growth, etc. to that of other similar businesses in the U.S. To change what appears on this toolbar, click on the down arrow next to More, and then select Rearrange Menu. When the Report List is displayed, you’ll see other navigational links in the left vertical pane that divide your reports into date ranges and categories. There’s also a link to the Activity Log, a running list of all activities by all users.

Create and customize

There are other screens in QuickBooks Online that contain links to related reports, but they’re all available on the Report List page. Intuit has done a terrific job of creating report templates that would work well as is for a wide variety of businesses.

But it’s likely that you’ll often want to make some changes to these pre-built models – at least change the date range covered, for example. So you can easily alter the content contained in each as well as its layout.

When the Report List is open, you’ll see two small icons next to each report name. Hover over the first to see a mini-sample of that report. When you click on the second, the small wrench graphic, the Customize window opens.

QBO 0214 image 2

Figure 2: You may be able to run some QBO reports as is. But if you need to make changes to better suit your company’s needs, customization options are available.

The date range that a report covers is one of the parameters that gets changed most often. You can also:

  • Toggle between accounting methods, creating your output using cash basis or accrual
  • Add subcolumns (Previous Year, % Change, etc.) for comparison and deeper analysis, and
  • Include all records in a list (Customer, Vendor, Product/Service, etc.) or just the ones that you select.

Other, less substantive options can be specified. For example, totals can be sorted to appear in ascending or descending order. Negative numbers can be displayed in a variety of ways. And you can choose what information will appear in the header and footer.

Tip: You can specify defaults for some of these by making the Company tab active, then clicking on Preferences | Reports.

QBO 0214 image 3

Figure 3: You can choose defaults for some report preferences.

Easy to produce

QuickBooks Online makes report customization and creation simple processes that you can learn fairly quickly. Some reports, like A/R Aging Summary, Sales by Product/Service Summary and Unbilled Time don’t require much explanation.

But financial reports like Balance Sheet, Statement of Cash Flows and General Ledger — critical as they are to understanding your company’s financial position – require a trained eye to be useful. We can create and analyze these reports for you periodically, and provide you with insight that can help you make the best business decisions.

Your QuickBooks Online reports can tell you much more than when inventory needs to be reordered and which customers are behind on their invoices. They can answer the questions you have about your company’s fiscal health – past, present and future — as well as the ones that you don’t even know to ask.