| Unless you’re the sole user of QuickBooks Online in your company, you’ll need to know how to set up different access levels.
“Anytime, anywhere access” is one of the buzz-phrases people use when they describe the benefits of cloud computing. It’s probably one of the most compelling reasons why businesses subscribe to QBO. That, and the fact that you can have multiple employees working on it: three for Online Essentials and five for Online Plus (in addition to an accountant for each).
Due to the sensitive nature of financial data, accounting software and websites almost always offer multiple configurations of user access. That is, you — as the Master Administrator, the individual who created the company file — can restrict to specified areas anyone else accessing QBO.
We recommend that you use this feature.
Simple Setup
To get started, click the small gear icon in the upper right corner, next to your company name. In the far right column, select Manage Users, which opens the window that displays information about everyone who has access, including your accountant. Click the New button on the right, and this dialog box opens:
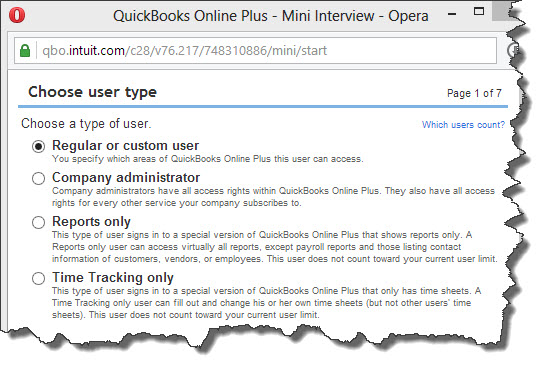
Figure 1: QuickBooks Online Plus lets you assign any of four access levels to employees (you are the Master Administrator). You may also invite your accountant.
You’ll probably assign the first entry in the list, Regular or custom user, most often. There are three access options. All is the default.
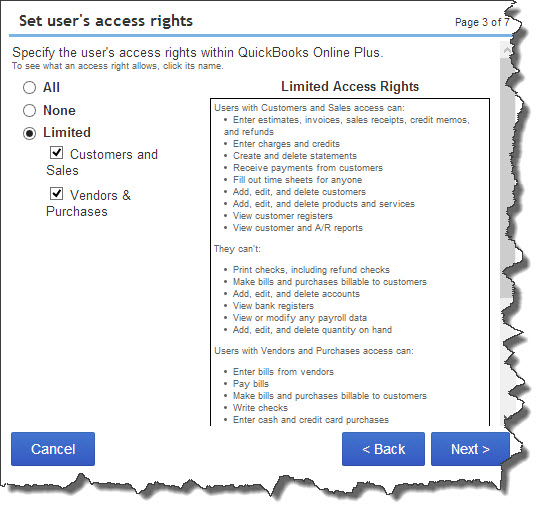
The second option is None, and the third, Limited. The latter lets you choose between:
In the next mini-interview screen, you indicate whether this user can modify users and their access rights, edit company information in Preferences, and view or change your QuickBooks online subscriber settings. Add the user’s email address on the next page, and he or she will receive an email with a link to a sign-in page (this same process is used for all new access level assignments).
Click Finish to complete this process.
Figure 2: This mini-interview in QuickBooks Online lets you specify access rights for your employees.
Specific Tasks
You can also assign specific tasks to users. For example, you may decide to have another user serve as Company Administrator, which grants access to all areas and capabilities of QuickBooks Online. Individuals can also be allowed to view Reports Only. This role grants access to all reports in QBO except those related to payroll, and any that contain contact information for customers, vendors, or employees. It doesn’t count toward your user total.
If individuals do occasional work for you and need to fill out timesheets (but are not employees), you can set them up for Time Tracking only. They can be connected to either an employee or, in the case of subcontractors, a vendor. And you can invite up to two accountants or bookkeeping firms, which are given Company Administrator privileges.
If you want to change these — or any other individual’s — access rights, click Edit on the Manage Users page. To see the Audit Log for any user, highlight their entry and click Activity on the same page.
Obviously, the security of your financial information is critical. QuickBooks Online provides easy-to-understand mechanics for defining user access, and you’ll want to maintain strict security. As always, we’re available for any questions you might have about this process. We can discuss any issues with you, as well as talk about additional options for data safety. |