Payroll requires countless details about each employee. QuickBooks Online will walk you through the process of entering them.
If you’ve only been on the receiving end of a paycheck, you may not know just how much prep work went into your neatly-organized paystubs. Those official-looking columns of numbers that described how much you earned and how much was taken out – and for what purpose – were the result of a tremendous amount of data entry when you were hired.
Now it’s your turn to discover how complex that recordkeeping task is. QuickBooks Online was designed for small businesspeople who weren’t schooled in the intricacies of double-entry accounting, so it simplifies the process of preparing for payroll as much as possible. Still, it will probably be the most challenging element of your web-based bookkeeping.
We can help you navigate these sometimes-choppy waters so that you’ll be ready to run your payroll with confidence. Here’s an overview, though, of one of the most critical steps: creating employee records comprehensively and accurately.
Just the Facts
The left vertical toolbar in QuickBooks Online contains a link for Employees. This is where you’ll add and edit staff records. Once you’re set up and have begun running payrolls, the page that this link opens will display your current year’s payroll cost totals. There will also be a list of employees and their pay rates and payment methods; you’ll be able to click on their entries to view and edit their record details.
To get started, though, you’ll click on Add Employee. This opens a page that asks for the individual’s:
- Full name,
- Withholdings (you’ll enter W-4 information here),
- Pay frequency,
- Pay type and amount (multiple options are available here besides salary and hourly),
- Deductions (retirement, health care, etc.), and
- Pay method (check or direct deposit).

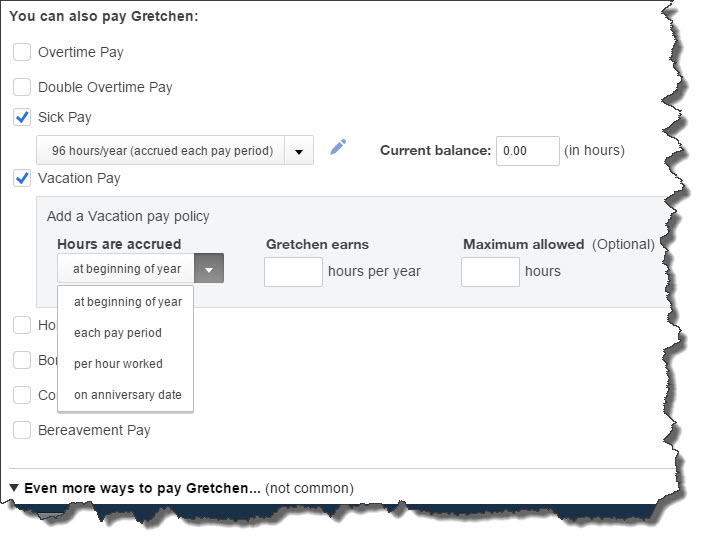
Figure 1: QuickBooks Online and its payroll component contain many screens like this that employ common data entry conventions. The mechanics are easy, but 100 percent accuracy is required.
Some of these requests for information have a small pencil icon next to them. This means that there are additional screens where you can provide the needed details. In the example above, you’re defining pay types that will be available to the employee, like sick pay and vacation pay.
Depending on your company’s benefits, entering deduction information may be the most detailed and time-consuming task. QuickBooks Online first lets you choose between entering a deduction/contribution or garnishment. If it’s health insurance, for example, you’ll have to indicate how much money will be deducted from employees’ earnings each pay period (in dollars or a percentage) and what the company-paid contribution will be (if any). If there’s an annual maximum, you’ll also enter it here, and you’ll indicate whether the premium amount is taxable or pre-tax.
A sample check is displayed in the right column of this page. As you enter information, the check will be filled in with the correct amounts. If you don’t have a particular detail at hand, you can save what you’ve done and come back later to finish the record. And you can always return to edit data you’ve supplied.
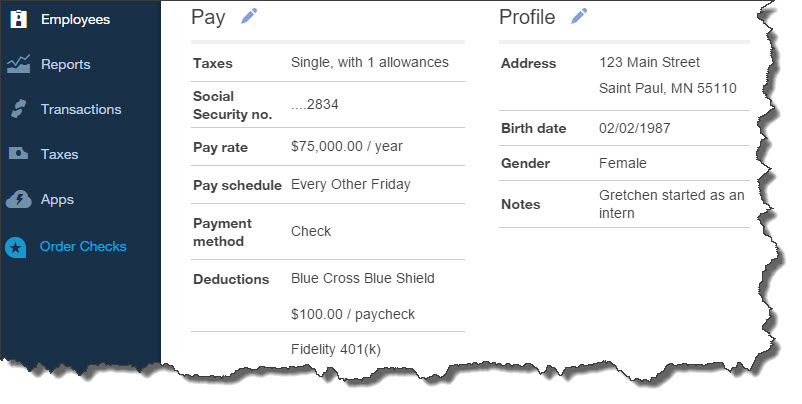
When you’ve completed all of this and clicked Done, you’ll be back at the Employees screen. Click on the name of the staff person whose records you just created, and you’ll see something like this:

Figure 2: Once you’ve created an employee’s record, you can view all of its details and edit it as needed.
There will undoubtedly be times when you’ll want to see your employee data in report form rather than clicking through numerous individual records. QuickBooks Online offers several report templates that accommodate this. You’ll click on Reports in the left vertical toolbar, and then All Reports | Manage Payroll. The most relevant here in terms of viewing employee-related information are:
- Vacation and Sick Leave,
- Employee Details,
- Payroll Deductions/Contributions,
- Workers’ Compensation, and
- Employee Directory.
Running your first payroll can be daunting. We hope you’ll let us help you prepare for it.
