Archive for the ‘QuickBookss Online’ Category:

Receiving Payments in QuickBooks Online

It’s probably your favorite activity in QuickBooks Online: recording payments from customers. Here are the options.

QuickBooks Online was designed to make your workflow fast, intuitive and easy. This is especially true of the interface upgrade that some of you are seeing now (Intuit is rolling out this new look in stages; screen shots displayed here come from the new version).

Receiving payments from customers has never been particularly difficult or time-consuming in any version of QuickBooks, but recent changes have streamlined the process even more.

What really streamlines the process of getting paid, though, is the ability to accept credit and debit cards. We highly recommend that you provide this option to your customers. If you’re not yet set up with a merchant account, we can help you get started.

A Common Scenario

The timing of your payments mandates the type of transaction you’ll use to record them. Probably the most common scenario occurs when you send invoices and your customers submit payments.

There’s more than one way to accept those payments in QuickBooks Online, but probably the easiest involves simply clicking on the Customers tab in the left vertical pane. Then click on the colored tab at the top of the screen that displays a dollar amount and the total number of open invoices.

 QBO 0514 image 1

Figure 1: Click on the middle bar in this navigational/informational tool in QuickBooks Online to see a list of your company’s unpaid invoices.

QuickBooks Online displays a table listing all of the customers with open invoices, the number unpaid and the current balance due. Click the Receive payment link in the ACTION column for each customer to go directly to the Receive Payments screen (if that link isn’t showing, click the down arrow, which displays additional options).

Links in the PENDING INVOICES column show how many invoices are open, and their status. Clicking on this link takes you to a list of transactions, which should be open to Invoices. You can select one or more by clicking in the box to the left of the customer name and then clicking the Receive Payment button in the ACTION column.

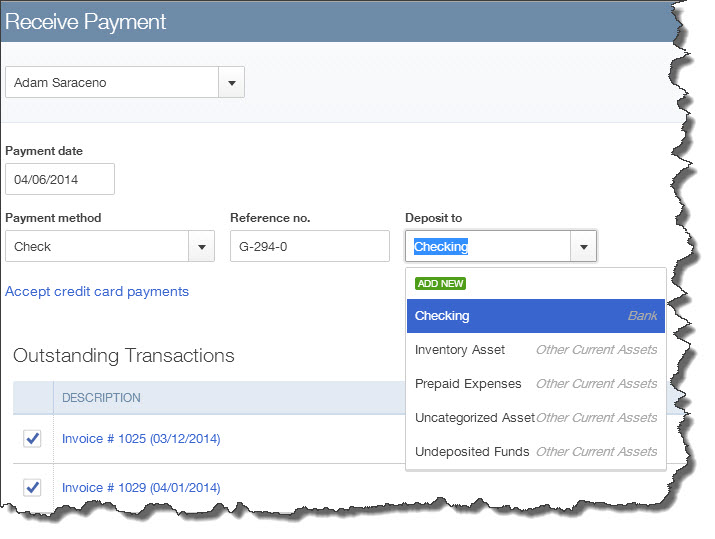
However you get there, the Receive Payments screen works the same. The customer’s name should already have been selected. Change the Payment date if necessary and select your payment method from the drop-down list, enter any related reference number and select the correct account for the money (ask us if you’re not sure). To the far right, enter the Amount received in the box supplied. Check the box in front of the invoice(s) that should be paid, and make sure that the Payment in the box on the far right is correct.
 QBO 0514 image 2

Figure 2: It’s easy to accept payments in QuickBooks Online. The site does some of the work for you.

If you have a merchant account and have enabled QuickBooks Payments, you’ll be able to record a payment using the customer’s credit or debit card (major cards are supported). When the customers receive invoices, they’ll be able to send their payments back electronically, which will have a positive effect on your accounts receivable and cash flow. The Online Payment button in your sales screens should be turned on when you’re creating the invoice.

Other Options

QBO 0514 image 3If a customer should pay you at the same time that the products or services are received, don’t create an invoice. Instead, click the + button at the top of the screen and select Sales Receipt in the Customers column. Fill in the blanks like you would in other sales forms.

Customers may occasionally make a down payment or pre-payment on a product or service. You can process this through the Receive Payments screen (click the + sign and then Receive Payment in the Customers column to get there) and apply it to an invoice later. If you already know what the items or charges will be, you can create an invoice and record the payment as a deposit.

There are multiple ways to receive payments in QuickBooks Online. You can even do so from the invoice screens themselves. So find what fits best into your workflow. You work hard to produce the products and services that your company sells; make sure that customer payments always reward that effort accurately.

Archive for the ‘QuickBookss Online’ Category:

Receiving Payments in QuickBooks Online

We’ll finish what we started last month: a walk through some of your most important Company Settings in QuickBooks Online Plus.

As we said last month, QuickBooks Online is designed to work for a tremendously wide variety of business types. Each, of course, has its own workflow and functionality needs. So the site comes with a number of preset defaults, settings that are commonly active in many companies.

You can change these, of course. Click the little gear icon in the upper right corner of the screen and select Company Settings.

We went through several of these last month, ending in the middle of the Sales Form Entry section. The remainder of this category deals with your options regarding:

  • Service Dates. Do you want a separate field that will distinguish this from other dates on the sales form?
  • Shipping. Do you want invoices, etc., to contain separate fields for this information? Ask us if you’re not sure which account should be used.

QBO 0414 image 1

Figure 1: The answers you supply in Company Settings will help shape QuickBooks Online to meet your specific needs. Default data can be changed on the fly.


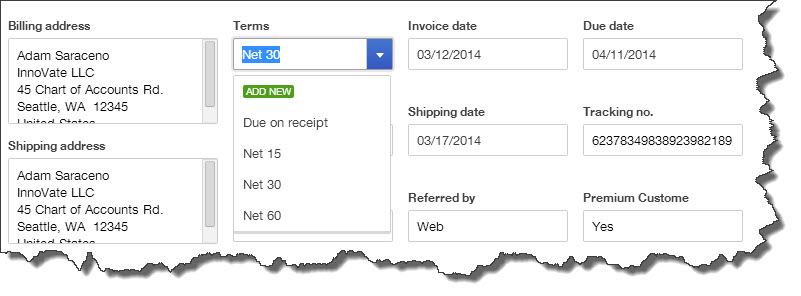
  • Terms. The default is Net 30, but you can select from other options.
  • Automatically apply credits. Should your invoices automatically apply existing customer credits?

The Form Delivery area of Company Settings covers a lot of ground. The first issue is major: Customize forms. QuickBooks Online contains tools that let you change the look and content of your sales forms, like their titles, column headings, your own contact information and visuals like fonts, text size and colors. You can also change the Delivery method default (print, email or none) and edit the standard message that appears in emailed sales forms.

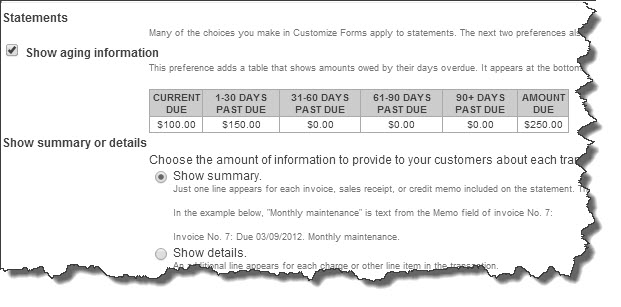
You can choose to Email a link to view and pay invoice online (merchant account required for customers to submit online payments) and dispatch emailed sales forms as PDF, HTML or plain text. And you can accept or modify the defaults for customer statements.

QBO 0414 image 2

Figure 2: You can specify how you would like customer statement information to appear by changing these Company Settings.

The next section begins with an innovative tool, Invoice Automation, that should be used with caution. This allows QuickBooks Online to create invoices for all customers with unbilled activity on a schedule that you specify. You have four options here:

  • Pass
  • Request reminders that invoices are waiting
  • Let QuickBooks Online create the invoices, but notify you, or
  • Let QuickBooks Online create the invoices without telling you.

If you choose the fourth option, let us work with you on invoice automation. You could end up having scrambled books, poor cash flow and/or confused customers if this isn’t handled properly.

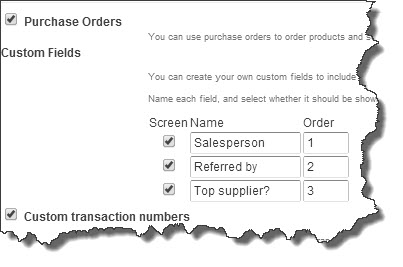
Vendors & Purchases is up next. You’ll specify your preferences here like billable expenses, markups, terms and automatically-applied bill payments (the latter can be tricky; please let us help here). You’ll also spell out any need for custom fields and custom transaction numbers in purchase orders.

QBO 0414 image 3

Figure 3: This section is totally optional, but it may be helpful if you want more ways to define and track your vendors by creating custom fields and custom transaction numbers.

Do you plan to use Time Tracking? You’ll first have to indicate whether you sell services and bill customers for time. Do you want your employees and subcontractors to see the rates you’re billing customers? If there’s a significant difference, you may not.

The final entries in Company Settings are minor housekeeping questions, with the exception of the reference to Payroll. You’ll have to click over to another section to manage this more complicated setup, and you’ll probably want our assistance with this.

The mechanics of establishing your company preferences are easy; you simply check or uncheck boxes and fill in fields. And the defaults can be changed at any time (for future activity).

But these are critical decisions that you’re making here. If you’re new to QuickBooks applications, some training will be in order. If you’ve been using QuickBooks Online for some time, it’s worth revisiting your Company Settings. You may find that your accounting solution is more flexible than you thought.

Archive for the ‘QuickBookss Online’ Category:

Receiving Payments in QuickBooks Online

If you’ve started using QuickBooks Online Plus and think something is missing, check your Company Settings. New users should do this first.

QuickBooks solutions are built to appeal to a wide variety of small businesses. But they’re also very customizable, which means that you can turn features on and off, specify default settings, change the layout and design of forms, and basically set it up so it seems like it was made just for you.

Let’s look at how this works in QuickBooks Online Plus. This cloud-based solution is easy enough to use that if you understand basic accounting concepts, you can jump in and start doing your bookkeeping. If you don’t understand basic accounting concepts, we can go through the setup procedure so you understand QuickBooks Online’s individual elements and how they work together.

If you do just dive in, at some point you’re likely to run up against something that’s missing, or doesn’t work the way you need it to. That’s why you need to look at QuickBooks Online’s Company Settings. You’ll find them by clicking on the little gear icon in the upper right corner and selecting Company Settings.

QBO 0314 image 1

Figure 1: This window opens when you click on Company Settings. It’s good to do much of your setup here before you get started, but you can always revisit it.

Many decisions

If you haven’t already done so, start at the top of the vertical pane and complete the blank fields in the Company Contact Info and Company sections.

Here are the other areas that you should visit as early on in your work as is possible.

Categories. Do you want to be able to assign transactions to Departments, Locations, Territories, etc.? You can use Territory Tracking to do so, but you can only select one of those designations to use throughout QuickBooks Online. If you choose Division, for example, you’ll create a list of options for that field in transactions, like Sales, Marketing, Accounting, etc.

But you can also categorize income and expenses using Class Tracking. This is especially useful at report time. QuickBooks Online lets you create multiple Classes and assign different ones to individual lines in the same transactions. So while each transaction can only have one designated territory, it may represent many classes.

This distinction can be confusing. In addition, it’s important that you create the best Territory and Class Tracking schemes for your purposes. Let us help.

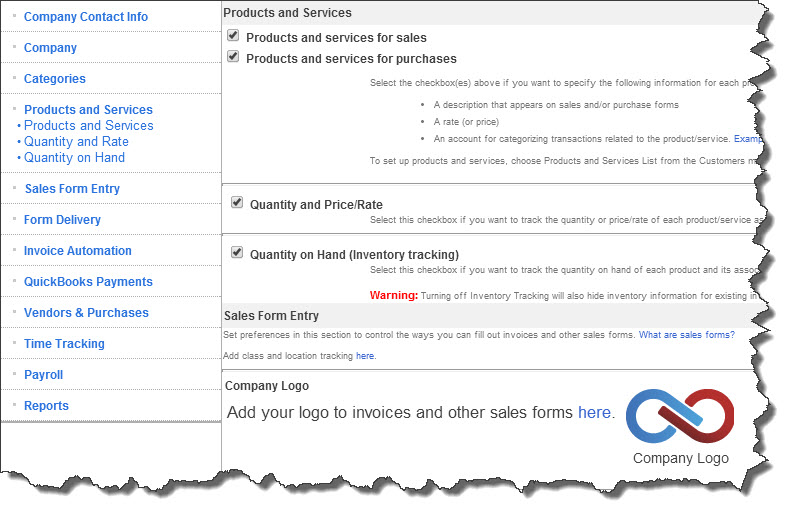
Products and Services. If you buy and/or sell products and/or services, you need to make sure these boxes are checked. The next two boxes should also be checked if you want to track the Quantity and Price Rate and Quantity on Hand (Inventory tracking).

QBO 0314 image 2

Figure 2: If you want to include Quantity and Price Rate on sales forms, you must specify this in Company Settings.

!!Note: Unless boxes are checked in front of QuickBooks Online features, you will not see them as you’re working on the site.!!

Company Logo. Easy. Simply upload the file that contains your company logo so that it will appear on forms.

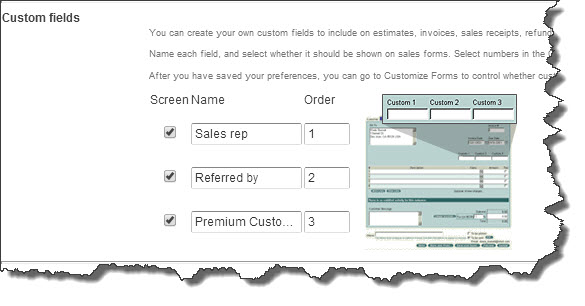
Custom fields. QuickBooks Online comes with a pre-defined set of fields in forms and transactions that are commonly used by many types of business. But it lets you add your own to meet the needs of your specific company. These fields will appear on invoices, sales receipts, refund receipts and credit memos. Put a check in the box at the beginning of each line, enter the labels for your new fields and designate their order of appearance (1, 2, 3). They will appear to the right at the top of your forms.

QBO 0314 image 3

Figure 3: Customize your sales forms by adding extra fields that your business needs.

Custom transaction numbers. QuickBooks Online auto-assigns numbers, but allows you to set up your own, more descriptive numbering scheme that can include letters.

Deposits. Does your company allow deposits? Check the box and QuickBooks Online will add a field to your invoices.

Discounts. If you offer flat rate and percentage discounts to customers, check this box and select the account where they should be recorded. Discounts given is the default, but you can change this – even for individual transactions.

Estimates billing method. Click the appropriate button to indicate whether you want Accepted or Pending or just Accepted estimate charges to appear on invoices, or not at all. You can also create a boilerplate message that will appear on estimates only and one for sales forms. These can be altered for individual transactions.

You’re not done yet. We’ll explore other Company Settings next month.

Archive for the ‘QuickBookss Online’ Category:

Receiving Payments in QuickBooks Online

The smartest business decisions result from customizing and creating frequent reports in QuickBooks Online.

Day after day, you build your company file in QuickBooks Online. You create invoices and purchase orders. Record payments and complete contact and item records. Process payroll and submit payroll taxes. Receive inventory and pay bills and nurture relationships with customers and vendors.

Your labors are rewarded when it comes time to use QuickBooks Online’s reporting tools. If you’ve been conscientious as you move through your daily accounting workflow, the reports that you can generate from this comprehensive compendium of data will arm you with the financial insight and analysis you need as you make critical decisions about the future of your company.

Assembling the precise slices of data you need would be difficult-to-impossible without QBO’s automated reporting tools. Its combination of pre-built templates and generous customization tools let you drill down on just the information you need.

 QBO 0214 image 1

Figure 1: QuickBooks Online makes it easy to find frequently-accessed reports quickly.

Click on the Reports tab. QuickBooks Online gives you fast access to commonly-used reports like Profit & Loss, Balance Sheet and Customer Balance Detail. Memorized Reports are those you’ve already customized and saved, and the Company Snapshot displays multiple charts that contain key financial data, a one-stop shop for your company’s current status.

The Scorecard (Trends) compares your cash flow, sales growth, etc. to that of other similar businesses in the U.S. To change what appears on this toolbar, click on the down arrow next to More, and then select Rearrange Menu. When the Report List is displayed, you’ll see other navigational links in the left vertical pane that divide your reports into date ranges and categories. There’s also a link to the Activity Log, a running list of all activities by all users.

Create and customize

There are other screens in QuickBooks Online that contain links to related reports, but they’re all available on the Report List page. Intuit has done a terrific job of creating report templates that would work well as is for a wide variety of businesses.

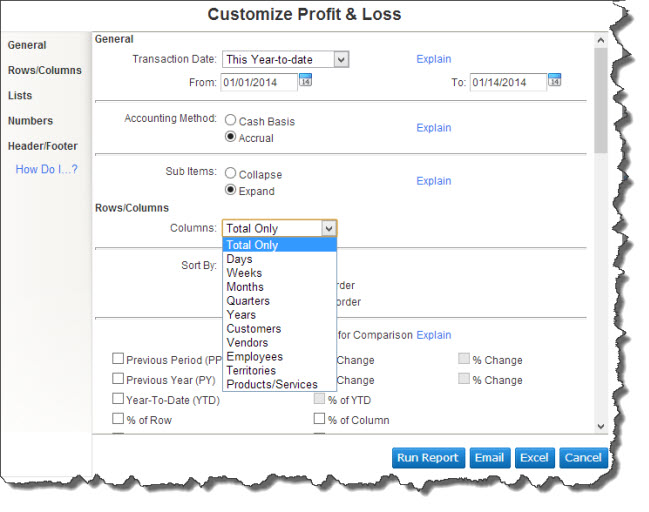
But it’s likely that you’ll often want to make some changes to these pre-built models – at least change the date range covered, for example. So you can easily alter the content contained in each as well as its layout.

When the Report List is open, you’ll see two small icons next to each report name. Hover over the first to see a mini-sample of that report. When you click on the second, the small wrench graphic, the Customize window opens.

QBO 0214 image 2

Figure 2: You may be able to run some QBO reports as is. But if you need to make changes to better suit your company’s needs, customization options are available.

The date range that a report covers is one of the parameters that gets changed most often. You can also:

  • Toggle between accounting methods, creating your output using cash basis or accrual
  • Add subcolumns (Previous Year, % Change, etc.) for comparison and deeper analysis, and
  • Include all records in a list (Customer, Vendor, Product/Service, etc.) or just the ones that you select.

Other, less substantive options can be specified. For example, totals can be sorted to appear in ascending or descending order. Negative numbers can be displayed in a variety of ways. And you can choose what information will appear in the header and footer.

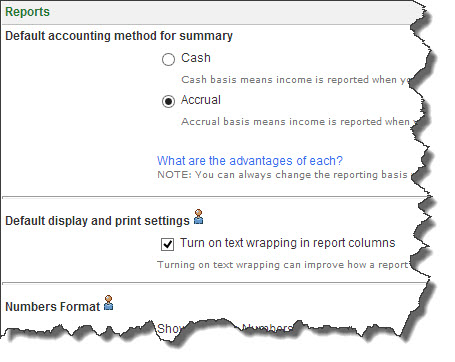
Tip: You can specify defaults for some of these by making the Company tab active, then clicking on Preferences | Reports.

QBO 0214 image 3

Figure 3: You can choose defaults for some report preferences.

Easy to produce

QuickBooks Online makes report customization and creation simple processes that you can learn fairly quickly. Some reports, like A/R Aging Summary, Sales by Product/Service Summary and Unbilled Time don’t require much explanation.

But financial reports like Balance Sheet, Statement of Cash Flows and General Ledger — critical as they are to understanding your company’s financial position – require a trained eye to be useful. We can create and analyze these reports for you periodically, and provide you with insight that can help you make the best business decisions.

Your QuickBooks Online reports can tell you much more than when inventory needs to be reordered and which customers are behind on their invoices. They can answer the questions you have about your company’s fiscal health – past, present and future — as well as the ones that you don’t even know to ask.

Archive for the ‘QuickBookss Online’ Category:

Receiving Payments in QuickBooks Online

If you’re used to opening an envelope, writing a check and mailing your payment, you’ll find bill-paying easier and faster in QuickBooks Online.

If you’re paying bills manually, this is probably one of your least favorite accounting chores. First, you know that you’re sending money away. And second, the process is tedious.

Further, how do you record paid bills? Do you file the paper stubs? Enter the payment in a ledger, or worse, your checkbook register? Rely on your carbon copies?

QuickBooks Online makes this process faster and easier. And you’ll never have to wonder if a bill was paid – or needs to be paid. Here’s how it works.

Billing Customers for Expenses?

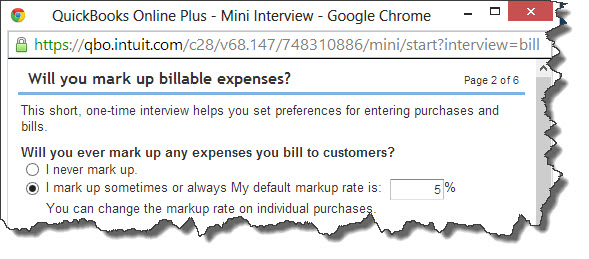
Bill-paying in QuickBooks Online is a two-step process. You first have to create a record for each bill. Click on the Vendors tab, and then on Enter Bills. The first time you do this, a QBO Mini Interview – an abbreviated section of your company Preferences — should pop up.

QBO 0114 image 1

Figure 1: Mini Interviews like this pop up occasionally as you’re getting started with QuickBooks Online. Here, you’re telling QBO whether you bill customers for expenses, and how.

Answer the questions and keep clicking Next until you’re finished. If you mark up billable expenses, talk to us about how to complete the interview if you’re all unsure of your answers. It gets complex, and must be done correctly.

When this window closes, you’ll be back at the main bill-entry screen. Make sure that Bill is selected in the upper left and select the vendor by clicking the arrow to display your list. If the vendor doesn’t appear, click << Add New >>, type in the vendor name and select either Quick Add or Add All Info…(the latter is recommended, so your records will be complete).

Warning: Your browser must allow pop-up windows for QBO to complete this task. If you don’t know how to set this up, we can help.

QBO 0114 image 2

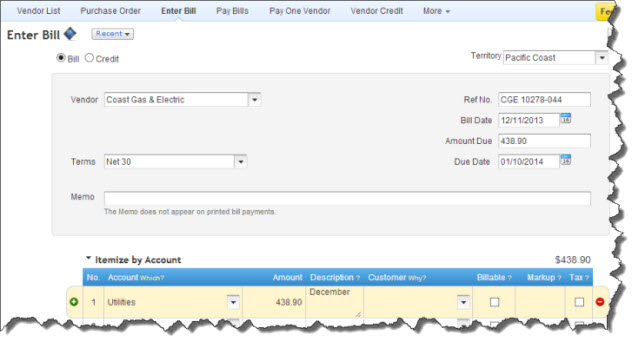
Figure 2: Once you’ve selected or added a vendor, minimal information is required to enter a bill in QuickBooks Online.

One-Time or Recurring

Your vendor’s Terms should have come through from its record if you established them there. Enter any Ref No., the Bill Date if it’s not the current one and the Amount Due. Enter a Memo to yourself if you want. Then move down to either the Itemize by Account or Itemize by Product/Service, depending on which is appropriate. Complete each line item.

When you’re done, you can click on Attachment if you want to attach another file, and then select either Save or Make Recurring. If you choose the latter, a window opens that contains your options here. You can save your template as:

  • Scheduled – Repeats the same bill with the same amount at the intervals you set
  • Reminder – Reminds you to attend to this bill as scheduled; you can edit it before it’s sent, or
  • Unscheduled – Saves a partially-completed copy of a bill that you can open, fill in and dispatch as needed.

Then you’ll just select the bill’s interval (10th of each month, etc.), specify an end date if there is one and indicate whether you’d like to be alerted to pending bills where appropriate. Click Save Template when you’re satisfied with your choices, do any additional work necessary with the bill itself and save it.

Fulfilling Your Obligations

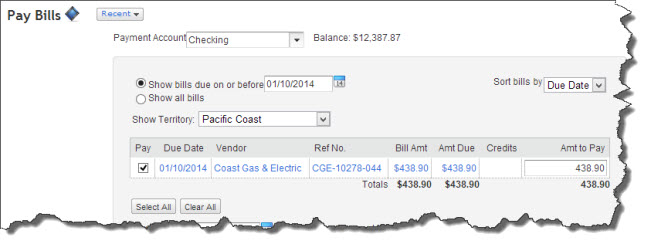
When you’re ready to pay bills, click on the Vendors menu and then Pay Bills. Click the arrow next to Payment Account and select the correct one, then enter a cutoff date (Show bills due on or before…) or select Show all bills. Change the sort order if you want (Sort bills by…) and narrow down the list by any other applicable filters (in the screen shot below, it’s Show Territory). Put a check mark in the box in front of each bill to be paid.

QBO 0114 image 3

Figure 3: QuickBooks Online lets you select a range of bills to pay.

Enter the Payment Date and Payment Method (handwritten check, printed check or electronic payment through your Intuit Payment Network account) and select the appropriate Save button. There’s more than one way to see if a bill has been paid; one of the easiest is to run the Bill Payment List report.

There’s more to learn about working with vendors and paying bills in QuickBooks Online; we’ll continue to explore these issues. As always, we encourage you to contact us if you’re having trouble managing your accounts payable. Better to clarify now than to tarnish your credit record with tardy payments.