Archive for the ‘QuickBookss Online’ Category:

Stretching QuickBooks Online: What You Can Do With Apps

QuickBooks Online has worked well for countless businesses as is. But if you need more than it offers in some areas, there’s likely to be an app for that.

You’d be hard-pressed to find two small businesses in the U.S. that have exactly the same needs when it comes to financial management. Fortunately, QuickBooks Online is powerful and flexible enough to please hundreds of thousands of small businesses.

As companies grow, they often find that the core features, user interface, and navigational tools that QuickBooks Online offers still suit them just fine. Still, they need to move beyond the tools offered in one or more areas.

That’s why QuickBooks Online has dozens of add-on applications – apps – that focus on one specific area of QuickBooks Online and extend what’s offered there. Since they’re all cloud-based, you have access to them anywhere, anytime, on a PC or mobile device, once you’ve set up an account.

To see what’s available, just click on the Apps link in the left vertical toolbar.

QBO 0215. image 1

Figure 1: You can choose from dozens of integrated applications built specifically to add features and flexibility to individual areas of QuickBooks Online.

Take a look around this page, and click on any of them to get more information. All of the apps listed were designed to fit QuickBooks Online, but if you’re new to integrated applications or wondering whether a specific one would be a good match for your business, we can help you decide – and get started with it.

QuickBooks Online’s apps cover a lot of ground. Each falls into one of several categories, including billing and collections, expense management, time tracking, and customer relationship management. We’ll look at three of them here.

Bill.com automates your accounts payable and receivable. It began its life as a billing app (hence the name), adding receivables a few years ago. Though you could use it as a sole proprietor, its features are more fully utilized in a team setting. You email, fax, or upload incoming bills to your Bill.com account, where they can be entered, routed to the appropriate staff person, approved, and processed (transmitted directly to a vendor bank account or remitted via paper check). The ability to store all related documents in the cloud and maintain a strict audit trail add to the site’s security. Automated invoices, reminders, and payments simplify your receivables workflow. Bill.com also provides a close, real-time look at your current cash flow and also projects future scenarios.

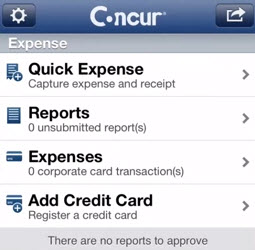
Concur Travel and Expense has very tight integration with QuickBooks Online; it shares, for example, customer, vendor, and employee records, as well as job data and expense types. Your employees can either enter expense data manually or use a smartphone to take pictures of receipts, which can then be uploaded directly into Concur and automatically attached to their expense reports, along with any credit card charges (which can also be sent directly). Once you’ve approved an expense report, Concur handles the background bookkeeping and transfers funds into your employees’ bank accounts.
QBO 0215. image 2

Figure 2: Your mobile employees can create and submit expense reports on the road using the mobile Concur app. iPhone, iPad, Android, and Blackberry are also supported.

Method CRM marries your QuickBooks Online data to your customer relationship management tasks. Lists of your customers, vendors, items, etc. and their associated records are available in the app, as are transactions like invoices, payments, and vendor bills. When prospects fill out forms on your website asking for product and/or service information, a new lead/sales opportunity is created in Method CRM. If a lead becomes a customer, that data is shared with QuickBooks. The app is exceptionally customizable, down to the actual design (should you decide to tackle this, though, let us work with you from the start).

There are many other types of apps that can be integrated with QuickBooks Online, including:

Constant Contact: Email marketing

TSheets Time Tracking: Timesheets and time tracking

Bigcommerce: Online shopping cart management

F|G Receivables Manager: Smart accounts receivable management

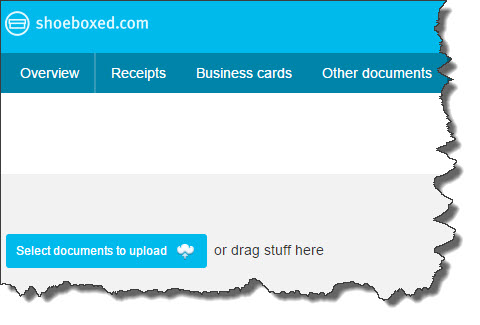
Shoeboxed: Scans and categorizes paper receipts
QBO 0215. image 3

Figure 3: You can upload or drag and drop files, forward emails, or send paper receipts through U.S. Mail in a prepaid envelope to Shoeboxed.

These apps are easy to use for the most part, but whenever you’re moving data in and out of QuickBooks Online, you need to have a clear understanding of the source and destination. We’ll be happy to assist as you move beyond the boundaries of QuickBooks Online.

Archive for the ‘QuickBookss Online’ Category:

Stretching QuickBooks Online: What You Can Do With Apps

Here’s an overview of the home page and what you can access from there.

Many companies have been hesitant to trust their financial data – and that of their customers and vendors – to the internet, despite the fact that solution providers have built sophisticated security systems for this critical information. But you’ve decided that the benefits of online accounting far outweigh its slight risk, and you’re ready to start using QuickBooks Online in 2015. Whether you’re making the transition from a manual bookkeeping system or moving your operations over from desktop QuickBooks, you’ll likely be pleased with the site’s usability, rich feature set, and convenience – starting with a very effective, aesthetically-pleasing home page.

QBO 0115 image 1

Figure 1: QuickBooks Online’s home page provides an overview of your company’s finances, including income, as pictured above.

One of the benefits of using online accounting is that it saves time. This is evident when you first sign into QuickBooks Online. You can immediately get a sense of your financial status from looking over the home page. Its individual elements include:

    • A graphic that displays the total dollars that have been billed to customers, the amount that’s past due, and the total paid in the last 30 days.
    • A chart showing where your money has gone in a given time period (categories and total dollar figures are displayed).
    • Your profit and loss for a customizable date range.
    • Account balances, and
    • A list of your most recent activities on QuickBooks Online.

All of these data areas are interactive. That is, you can click on one to open a screen that displays details for each.

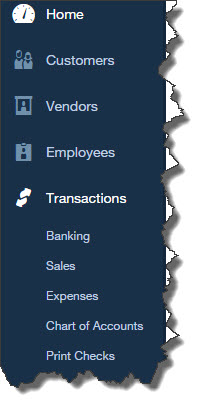
The left vertical pane of the home page is a navigational tool that takes you to the main screens of QuickBooks Online’s activity pages. Each has its own navigational tools that should be familiar if you’ve used any kind of software before.

QBO 0115 image 2

Figure 2: This navigational tool helps you move quickly to QuickBooks Online’s task areas. Besides those pictured here, you’ll see Reports, Taxes, and Apps.

QuickBooks Online offers a navigational tool on the home page that is also carried over to other screens on the site. At the top of each screen is a kind of mini-toolbar that contains three icons:

    • The magnifying glass opens the site’s Search Transactions tool and its Advanced Search.
    • The “+” sign displays the Create window, which contains links to the transactions you can process for Customers and Vendors; to activities related to Employees; and to miscellaneous tasks like Transfers and Statements.
    • The third icon, which looks something like a clock, opens a list of the most Recent Transactions.

Finally, in the upper right corner you’ll see a link to QuickBooks Online Help, and a small icon that looks like a gear. Clicking on the latter opens a window that displays your company name and links to four types of tools and data: Settings, Lists, Tools, and Your Company, as shown here:

QBO 0115 image 3

Figure 3: Much of your setup and maintenance tools are accessible by clicking on the small gear icon in the upper right corner of QuickBooks Online.

You’ll click some of these links as you’re readying QuickBooks Online for use, to perform setup tasks like:

    • Establishing your Company Settings. These used to be called Preferences, and they include specifying your accounting method, defining custom fields, and assigning accounts. The site is pre-populated with defaults, but you can change these.
    • Creating records for your Products and Services.
    • Working with your Payroll Settings, and
    • Assigning access limits as you set up and Manage Users. If you have multiple employees using QuickBooks Online, you’ll want to specify what they can and can’t do.

Once you’ve prepared QuickBooks Online to meet your company’s specific data and workflow needs, you’ll occasionally want to get to these links to, for example, set up Recurring Transactions and Reconcile accounts.

We truly hope you’ll include us in your QuickBooks Online setup process. Although we can come in and troubleshoot when you have a problem, it’s much wiser to customize QuickBooks Online from the start.

Archive for the ‘QuickBookss Online’ Category:

Stretching QuickBooks Online: What You Can Do With Apps

To whom do you owe money to, how much, and when? The QuickBooks Online Vendor Center answers these questions quickly.

Whoever handles Accounts Payable for your company has an unenviable job. While the Accounts Receivable person gets to send invoices and happily record payments, the A/P employee has to make sure that:

  • Complete records exist for all vendors.
  • Billing information – including due dates — is entered correctly for all accounts.
  • Bills are entered when they come in, and,
  • Bills are paid on time (after ensuring that there’s enough money in the payment account).

Once the required data is entered and you’ve started paying bills, though, QuickBooks Online rewards you for your hard work by providing a visual roundup of your payables.

QBO 1214 image 1

Figure 1: Click on Vendors in QuickBooks Online, and you’ll see instantly where you stand with payables.

Standard QuickBooks Online conventions

The QuickBooks Online Vendor Center consists of several elements. A small vertical toolbar located at the very top of the screen contains links to the same functions as are found on other QuickBooks Online screens. You can search for, create, or list (recent) transactions.

In the far upper right is a navigational button represented by your company name (you’ve probably seen this before). Click on it for links to Settings, Lists, Tools, and your company information. There’s also a button that will open the QuickBooks Online help files. However, these help files don’t always fully answer questions, so let us know if you’re stumped.

Working with bills

Two additional links off to the right take you to instructions for preparing 1099s and blank vendor record screens. You can import existing vendor records in Excel and CSV formats; but please let us assist if you intend to do this, since your incoming file has to adhere to a very precise format. Fixing a file that has been imported improperly can be a very time-consuming project.

A color-coded horizontal bar near the top of the screen displays very important numbers that represent:

  • Amount on purchase orders.
  • # of Open Bills and dollar total.
  • # of Overdue Bills and dollar total, and,
  • # of bills Paid Last 30 Days and dollar total.

Click on any of these colored bars, and QuickBooks Online displays a list of related bills in the table shown below.

Using the table

QuickBooks Online follows a format for the Vendor Center that’s similar to the one found in the Customer Center. The Vendor Center table – a grid, or mini-spreadsheet — takes up the bulk of the screen.

QBO 1214 image 2

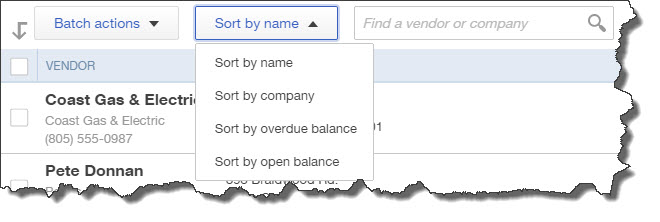
Figure 2: The table in the QuickBooks Online Vendor Center lets you display your vendor list using any of several sort options.

The image above shows what the left side of the table looks like. To perform a batch action, like email, on multiple vendors, you’d first click in the boxes in front of each, and then click the arrow next to Batch actions to open the menu. You can also sort by a number of fields, and search for a vendor or company.

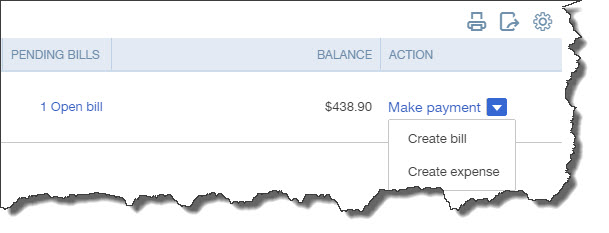
On the right side of the table, you’ll get information on each vendor’s status, their PENDING BILLS and any outstanding BALANCE. Your ACTION options include Create Bill, Write check, and Create purchase order, in addition to, of course, Make Payment.

QBO 1214 image 3

Figure 3: To the right of a vendor’s name and address in the table, you can see if there are any open or overdue bills and make a payment.

The small icons in the upper right let you print, export a table to Excel, and modify the table display.

The Vendor Center doesn’t really do anything on its own besides provide information. But it contains links to vendor-related functions, and it’s one of the first places your Accounts Payable employee should check every morning.

Your vendor activity, of course, has significant impact on your company’s overall cash flow. As we prepare to mark the end of one year and the beginning of another, it would be a good idea to take a look at how well that cash flow has performed during 2014. There may be adjustments you can make to improve it in 2015. As always, this is an area where we’d be happy to provide some direction.

See you on the other side of the New Year.

Archive for the ‘QuickBookss Online’ Category:

Stretching QuickBooks Online: What You Can Do With Apps

The word “account” can mean more than one thing in QuickBooks Online.

Before you started doing accounting tasks for your small business, the word “account” simply referred to your accounts at a financial institution – checking, savings, credit cards, etc. QuickBooks Online lets you access these same kinds of accounts via the internet and download their transactions.

But “account” has an additional meaning in accounting. Your Chart of Accounts is a list of accounts that will be used in transactions to categorize them and create accurate reports. It is a critical element of your bookkeeping and needs to reflect your company’s business structure correctly.

Where does the Chart of Accounts come from?

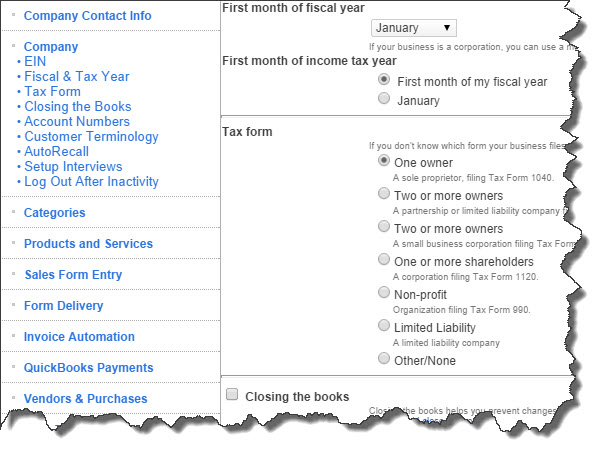
QuickBooks Online builds your Chart of Accounts based on the questions you answer when you first start using the application. You can revisit them by clicking on the small wheel icon in the upper right corner of the screen and selecting Company Settings.

QBO 1114 image 1

Figure 1: One of the reasons you’re asked to respond to so many queries about your company when you began using QuickBooks Online is so that the application can build an accurate Chart of Accounts for you.

How is the Chart of Accounts organized?

The Chart of Accounts is typically divided into several account types (each of which contains an individual account), including:

  • Assets. What you own
  • Liabilities. What you owe
  • Income. What you earn
  • Cost of Goods Sold. What it costs to create products
  • Expenses. Additional costs required to operate your business

Do I need to assign transactions to accounts manually?

Not usually. QuickBooks Online knows, for example, that an invoice will go to the Accounts Receivable account, so there’s no field for Account on invoice forms. The same goes for purchase orders; they’re assigned to Accounts Payable. On the other hand, you must select an account when entering expenses or writing checks, and your product and service records must be assigned to the correct accounts.

QBO 1114 image 2

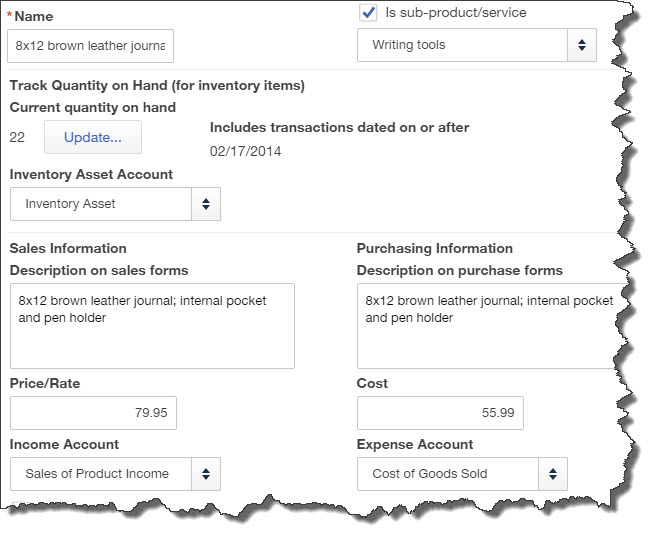
Figure 2: When you create product records, you’ll need to assign the correct accounts from your Chart of Accounts. QuickBooks Online supplies a drop-down list of your options.

Do I need to number my accounts in the Chart of Accounts?

No. QuickBooks allows this, but you shouldn’t try it on your own. Let us assist you.

Can I edit the Chart of Accounts?

Yes. Again, QuickBooks allows this, but please contact us if for some reason you think editing is necessary.

Do accounts appear on reports?

Yes, primarily financial reports like Profit & Loss, Statement of Cash Flows, and the Balance Sheet. These are reports that we should run for you periodically.

How do I see my Chart of Accounts?

Click the small gear icon in the far upper right of the screen, and then select Chart of Accounts. If you want to familiarize yourself with the types of transactions each contains, highlight one and click the Register button in the upper right.

The Other Accounts

On to more familiar territory that you can actually work with yourself: the accounts you hold with financial institutions.

Since those accounts are tracked in the Chart of Accounts, you’ll have to access that part of the site to set them up. But please restrict your activities here to your own financial accounts.

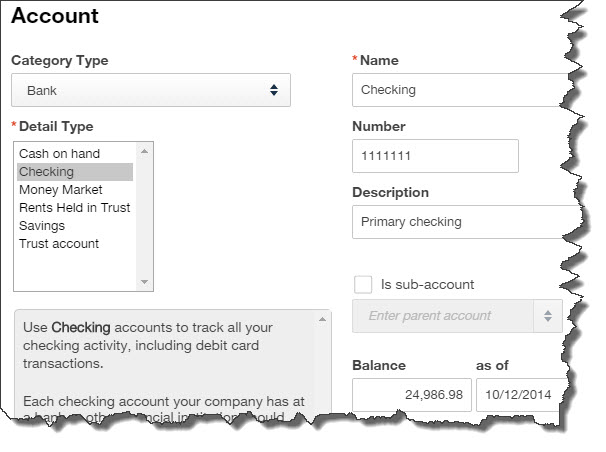
Click the small gear icon in the far upper right and then select Chart of Accounts. Click the New button in the row of activity icons. This window opens:

QBO 1114 image 3

Figure 3: You should set up a separate account in QuickBooks Online for each active account that you have at financial institutions.

Repeat this process for every account.

How do I set up QuickBooks Online to download transactions from my bank?

Click Transactions in the left vertical pane and then click Banking. Click the Add Account button in the upper right. Choose one of the banks listed or enter the URL for your bank in the field at the top. Enter the user name and password you use to access that account online. If you’ve never done that, we can walk you through it.

You’re now connected to your account at your financial institution and can download transactions as they come through.

There are many benefits of using online banking in QuickBooks Online. Your accounting records will be more accurate. You won’t have to enter transactions twice. And you’ll always know what your real balance is.

If you’re new to online banking, we suggest you let us help you get started. It’s not difficult once you get going, but dealing with transactions once they’re downloaded (reconciling accounts, etc.) takes some learning time. If you make the effort, though, you’ll find you’re saving time and getting a real-time, accurate view of your financial status.

Archive for the ‘QuickBookss Online’ Category:

Stretching QuickBooks Online: What You Can Do With Apps

Depreciation is a very complex element of the tax code. It’s best you don’t try to tackle it on your own.

From time to time, you may buy a piece of equipment for your business.  This can be anything from a small computer to a large machine that makes little washers to use in the products you sell to your customers.  You don’t plan to retire this equipment after using it for a year.  Rather, it will be used over a period of years, so you’ll want to depreciate it for tax purposes.

TaxPlan 1014 imageWhat do you need in order to depreciate a piece of equipment?  First, you must own it.  If you rent a piece of equipment, you cannot take a depreciation deduction for it.  (However, there is a deduction available for rental payments that is recorded on your Schedule C, on another line.) 
Second, you have to use it in your business.  You can’t claim depreciation on the family computer that you only use in your business part of the time.  You can take some depreciation, but the amount you can record in depreciation will be reduced by the percentage you use the computer for personal tasks.

Third, the equipment must have a determinable useful life, which must be longer than one year.  In other words, you have to know how long you should be able to use the equipment.  The IRS establishes guidelines that determine the expected life of  specific pieces of equipment.  If you don’t anticipate using it for longer than a year, you should deduct it as another type of expense for the current year.

Finally, you will also need to know the depreciable basis of the property. This is a fancy term for a complicated concept. It’s calculated by taking the amount you paid for the equipment and any parts added to it (to make it run better or last longer), less any casualty losses and any depreciation you had recorded in a prior year. 

There will be times when you can’t take depreciation on a piece of equipment or a building you’ve purchased. For example, if you bought some equipment and started using it in your business, but then decided it wasn’t what you needed and got rid of it, you can’t take depreciation on it.  Or if you made the purchase to upgrade another piece of equipment, or added an addition to your home for a home office, you cannot deduct depreciation for it.  You could, however, take depreciation on the value of the upgraded piece of equipment or building.

There are other issues involved in calculating depreciation. This is a very complex area of the IRS tax code, and we don’t expect you to understand it fully. So if you’re planning a major purchase of equipment or other property, let us help you determine the best way to claim it for tax purposes.

Archive for the ‘QuickBookss Online’ Category:

Stretching QuickBooks Online: What You Can Do With Apps

Your first transaction in QuickBooks Online was probably an invoice. But there are many others that you’ll want to know how to use.

You probably process more invoices than any other kind of sales transaction in QuickBooks Online. And it’s usually with a great deal of satisfaction that you create these forms, since it means that you’ll be getting paid for providing services or selling products.

But there are numerous other sales transaction forms available on the site. Maybe your business is simple enough that you don’t have occasion to use them, but you should still understand what they are and when you should create them.

The easiest way to locate these forms is by clicking the “+” sign that appears at the top of many screens. By default, this opens a short list of the most commonly-used transactions. Click Show more to see the entire list.

Let’s look at the eight entries under Customers. They are:

Invoice. Use an invoice form if you want to bill a customer for a product or service for which you expect to be paid for at a future date. You can either print and send these through the U.S. Mail or email them.

Receive Payment. This is the enjoyable part: recording a payment – via cash, check, or credit card – that you’ve received from a customer. It’s critical that you deposit these funds to the correct account. If there’s any question, or if you want to start accepting credit cards (merchant accounts are complicated), contact us.

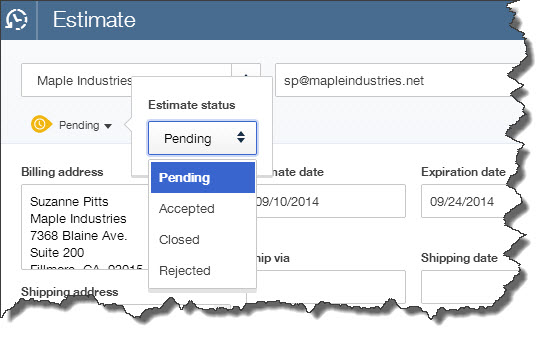
Estimate. These are often used for larger – or multi-part – jobs, although, depending on the type of business you operate, you may create them on a regular basis for simpler transactions. When you send an estimate, you’re not asking the customer for money; you’re simply presenting an approximation (or in some cases, an absolute dollar amount) of the costs anticipated. QuickBooks Online reminds you of open estimates when you start to create a new invoice for a customer who’s received an estimate.

QBO 1014 image 1

Figure 1: An estimate is not a bill or invoice. It tells your customer how much you anticipate charging for a requested product or service.

Credit memo. This can get tricky. There are several situations in which you’d issue a credit memo, including a pricing dispute, returned products, or overbilling. If a customer has not yet paid, the credit memo will reduce what’s owed. If payment has already been made, the customer can either apply the credit to future purchases or request a refund.

Sales receipt. This one’s easy. You create a sales receipt when you receive payment at the same time a customer receives goods or services. Obviously, no invoice will be necessary.

Refund receipt. This type of sales transaction records a refund issued to a customer. But there are many reasons why a customer would receive a refund from you. What was the original transaction type? What account should the refund come from? We can go over with you the various possible scenarios when you begin issuing refunds.

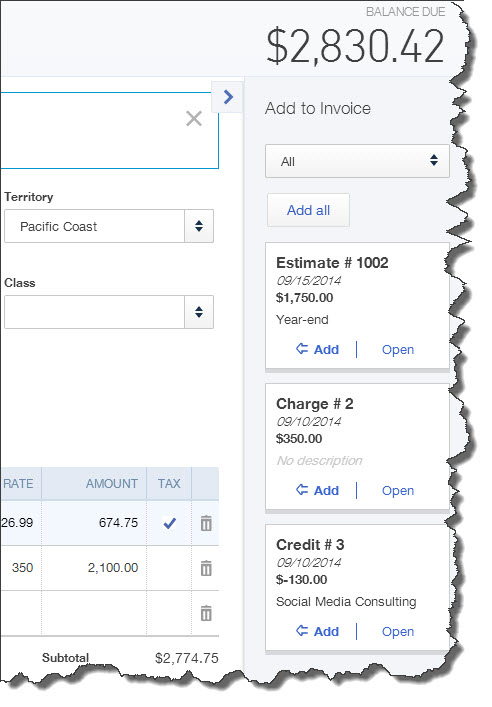
Delayed credit. If you know a customer is returning a product but you haven’t yet received it, for example, you would complete this transaction form. QuickBooks Online displays this credit in the right vertical pane of the next invoice you create for the customer.

Delayed charge. If a customer will owe you money for a product or service or fee at a future date but you don’t want QuickBooks Online to record it yet, you can use this form to track it. When you do create an invoice for the customer, any delayed charges will appear in the right vertical pane.

QBO 1014 image 2

Figure 2: Boxes like these will appear in the right vertical pane of new invoices for the affected customers, and you can automatically add them or open the original form. They do not affect the balances of any of your accounts in QuickBooks Online until they’re included in an invoice.

There are so many ways a sales transaction can go, so many variables. But it’s important that you record them using the tools that QuickBooks Online has designed for your financial accounts. It’s difficult and time consuming to fix a transaction that was entered incorrectly at the start. We’ll be happy to go over these sales transaction types in depth or to consult with you on any confusing situations you come across.

Archive for the ‘QuickBookss Online’ Category:

Stretching QuickBooks Online: What You Can Do With Apps

Unless you’re the sole user of QuickBooks Online in your company, you’ll need to know how to set up different access levels.


“Anytime, anywhere access” is one of the buzz-phrases people use when they describe the benefits of cloud computing. It’s probably one of the most compelling reasons why businesses subscribe to QBO. That, and the fact that you can have multiple employees working on it: three for Online Essentials and five for Online Plus (in addition to an accountant for each).


Due to the sensitive nature of financial data, accounting software and websites almost always offer multiple configurations of user access. That is, you — as the Master Administrator, the individual who created the company file — can restrict to specified areas anyone else accessing QBO.


We recommend that you use this feature.


Simple Setup


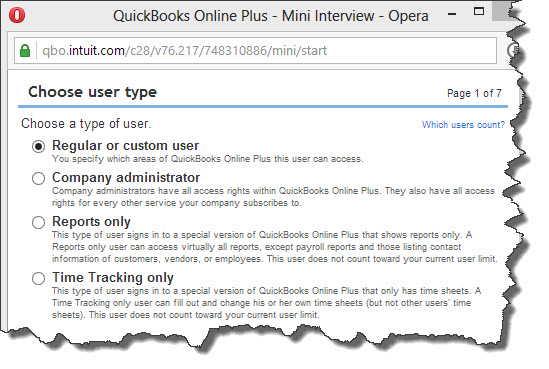
To get started, click the small gear icon in the upper right corner, next to your company name. In the far right column, select Manage Users, which opens the window that displays information about everyone who has access, including your accountant. Click the New button on the right, and this dialog box opens:


QBO 0914 image 1

Figure 1: QuickBooks Online Plus lets you assign any of four access levels to employees (you are the Master Administrator). You may also invite your accountant.


You’ll probably assign the first entry in the list, Regular or custom user, most often. There are three access options. All is the default.


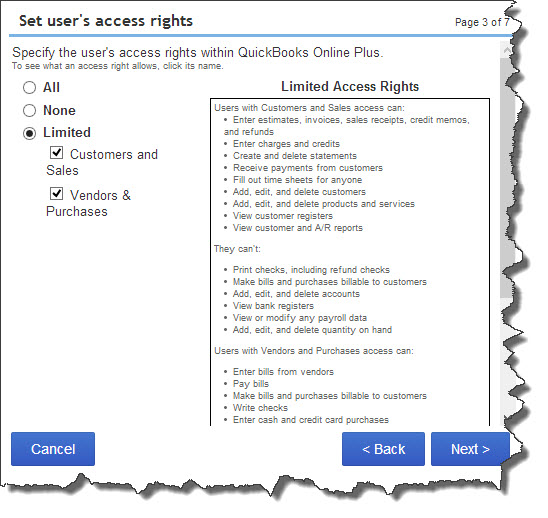
The second option is None, and the third, Limited. The latter lets you choose between:

  • Customers and Sales (enter sales forms; receive payments; fill out time sheets; add, edit, and delete customer and item records; and view customer registers and receivables reports)
  • Vendors & Purchases (enter and pay bills, and make bills and purchases billable to customers; write checks and record cash/credit card purchases; view bank registers, vendors/payables reports, and the Check Detail report; and print checks, except for refund and payroll checks)
  • Both.

In the next mini-interview screen, you indicate whether this user can modify users and their access rights, edit company information in Preferences, and view or change your QuickBooks online subscriber settings. Add the user’s email address on the next page, and he or she will receive an email with a link to a sign-in page (this same process is used for all new access level assignments).


Click Finish to complete this process.


QBO 0914 image 2


Figure 2: This mini-interview in QuickBooks Online lets you specify access rights for your employees.


Specific Tasks


You can also assign specific tasks to users. For example, you may decide to have another user serve as Company Administrator, which grants access to all areas and capabilities of QuickBooks Online. Individuals can also be allowed to view Reports Only. This role grants access to all reports in QBO except those related to payroll, and any that contain contact information for customers, vendors, or employees. It doesn’t count toward your user total.


If individuals do occasional work for you and need to fill out timesheets (but are not employees), you can set them up for Time Tracking only. They can be connected to either an employee or, in the case of subcontractors, a vendor. And you can invite up to two accountants or bookkeeping firms, which are given Company Administrator privileges.


If you want to change these — or any other individual’s — access rights, click Edit on the Manage Users page. To see the Audit Log for any user, highlight their entry and click Activity on the same page.


Obviously, the security of your financial information is critical. QuickBooks Online provides easy-to-understand mechanics for defining user access, and you’ll want to maintain strict security. As always, we’re available for any questions you might have about this process.  We can discuss any issues with you, as well as talk about additional options for data safety.

Archive for the ‘QuickBookss Online’ Category:

Stretching QuickBooks Online: What You Can Do With Apps

Keeping a positive cash flow is always a struggle for many businesses. Here’s how you can get customers to pay faster.

In a perfect world, customers would receive their invoices from you and remit them immediately.

You may have a diligent few who operate that way, but probably most everyone you do business with delays payment to improve their own cash flow.

There are steps you can take to speed up your incoming revenue. QuickBooks Online incorporates numerous ways to accomplish this.

Institute a prepayment policy. This is best implemented if you provide services and/or perform large jobs. You could, for example, require that all sales that fall above a specified dollar amount will require a deposit up front. Then consider lowering this threshold for newer customers and raising it for those who have been with you for a while and always pay on time.

QBO 0814 image 1

Figure 1: One way to apply deposits on future work or services is to record them as you’re preparing an invoice. To avoid bookkeeping errors, contact us before you begin accepting prepayments.

Recording deposits in QuickBooks Online is tricky. There are a number of ways to do it, but some will result in bookkeeping inaccuracies. If you’re going to begin collecting prepayments, please let us go over your options and the steps required.

Pull out the stops when it comes to supported payment methods. If you’re still only accepting cash and checks, this is clearly affecting your cash flow in a negative way. Intuit offers services that allow you to:

  • Send invoices online
  • Accept credit and debit cards
  • Scan checks for quick deposit, and
  • Make sales even when you’re not in the office.

We can go over the options with you. There will be some additional fees to add to your processing costs, but these methods provide the easiest, fastest path to healthier accounts receivable.

Invoice immediately. This should be a no-brainer, but it’s easy to get caught up in day-to-day operations and neglect money that’s waiting to be collected. Set up a check-and-balance procedure that becomes a regular part of your end-of-day work. Using QuickBooks Online reports can help. If you don’t know which reports to generate, we can identify them for you.

At the very least, check the Activities | Needs Attention list in the right vertical pane, and look at your income-tracking overview screen (click on the Customers tab in the left vertical pane).

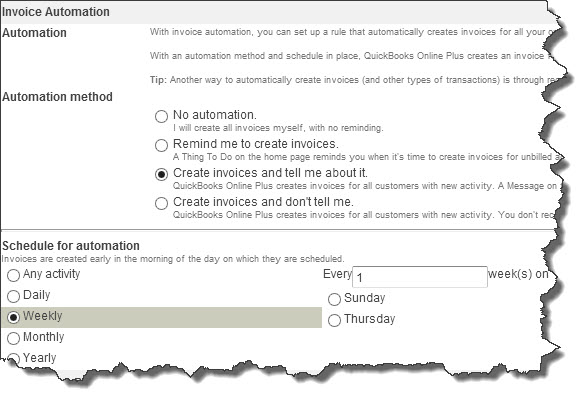
Use QuickBooks Online’s invoice automation tools. Here, too, you may want us to walk you through the process of setting this up. Automation is great when it’s defined properly; but you could end up affecting your cash flow in a negative way if this isn’t done correctly.

QBO 0814 image 2

Figure 2: Invoice automation can help ensure that no sales fall through the cracks, but correct setup is critical to understanding these tools. Let us help.

Perhaps you’ve tried these methods and still find yourself with under-the-wire or overdue electronic payments and paper checks. We can help you explore some additional ideas after looking over your company file and learning about your workflow.

Intuit’s Ongoing QBO Upgrade

If you’ve been reading this column for a while, you’ve probably noticed that the screen shots displayed here look different from yours. Intuit has been rolling out this new interface for quite some time now, but it may not have reached you yet. The company began by converting interfaces for “less complex” businesses, like users of the current QBO lineup and those that don’t employ integrated products such as QuickBooks Payroll and QuickBooks Payments.

When it’s your turn for the upgrade, you’ll see an invitation when you sign in to your company file. You’ll have 28 days to make the switch. You may be able to ask for earlier consideration via your To Do list, which could result in a more timely upgrade. This new version is free of charge to you.

The new QBO looks and works differently, especially the home page. So when you get access to it, we can help you get up to speed quickly.

Archive for the ‘QuickBookss Online’ Category:

Stretching QuickBooks Online: What You Can Do With Apps

You’re not required to use statements in QuickBooks, but they help bring unpaid amounts to the attention of your customers.

Collecting outstanding payments is probably one of your least favorite tasks as an accounting manager. QuickBooks Online helps you keep track of these debts in many ways, like through the Income Tracker and Collections Report.

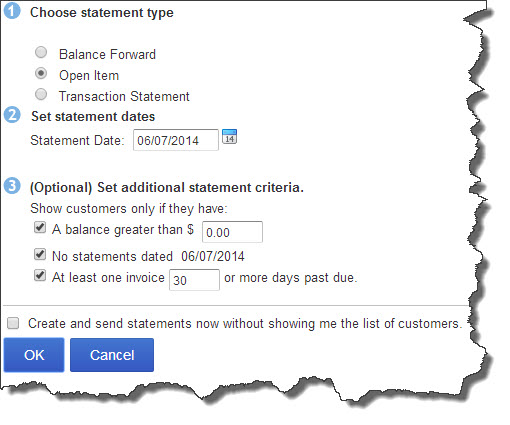
There’s another tool that isn’t used strictly for reminding customers of overdue invoices, but it can be effective in that endeavor: the QuickBooks Online statement. There are three types:

  • Balance Forward (lists all activity within a specified date range),
  • Open Item (only includes unpaid transactions), and
  • Transaction Statement (displays the receivables total and amount received within a stated period).

 QBO 0714 image 1

Figure 1: You can choose from among three different statement types in QuickBooks Online and select additional options.

QuickBooks Online’s Open Item statement would be most useful in collecting outstanding payments. There are two ways to get there. If you’re just sending one to a customer you know has past-due invoices, you can click on the Customers link in the left vertical pane and hover your cursor over that individual or company to highlight it. Then click the arrow next to the drop-down list in the ACTION column and select Send Statement.

If you’re sending multiple statements, click the “+” sign at the top of the screen; and then select Statements. Select Open Item, change the date if necessary, and check or uncheck the boxes below if needed. Click OK.

Note: QuickBooks Online gives you the option of creating and sending statements without looking at the list of selected customers. We do not recommend this. If your criteria have pulled in someone who shouldn’t receive a statement, your unnecessary mailing to them may be annoying.

The next screen will display a list of all customers who met your criteria. If you think you may have incorrectly defined your set of customers, click Change to return to the previous screen. You can also review QuickBooks Online’s Statement List (a report).

Note: If there are missing statements, check the original form’s date. Extra statements? Make sure you sent an invoice. In both cases, it’s possible that you’re trying to include a sub-customer. Still having problems? Let us help.

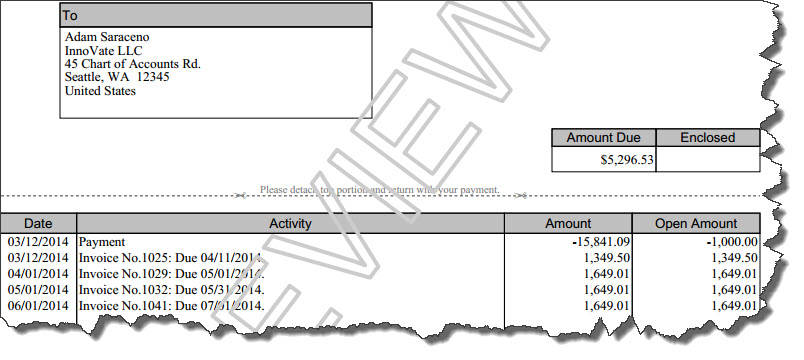
The right side of the screen gives you more information about each, Balance Due and Delivery Method (you can edit the latter if you want). Click the Preview button by each to see what the statement will look like.

 QBO 0714 image 2

Figure 2: Before you print or email statements, you can get an advance look at their layout and content.

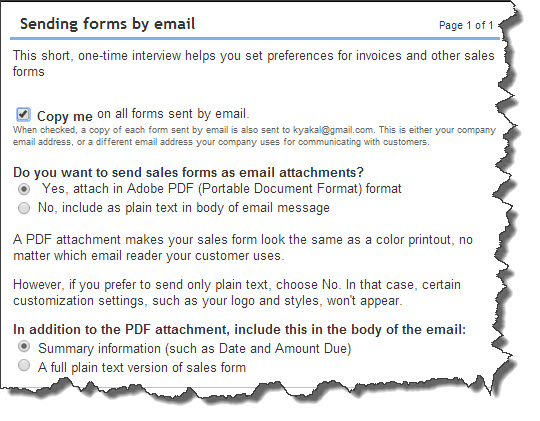
When you’re satisfied that everything is correct, click Create/Send Selected Statements. If you’re emailing some statements and haven’t yet specified your form delivery Preferences, a QuickBooks Online Mini-Interview window should open, letting you indicate whether you:

  • Want to be copied on outgoing sales forms,
  • Want invoices sent as PDFs or plain text in the message body, and/or
  • Want summary information or plain text included in the message body if you send PDFs.

 QBO 0714 image 3

Figure 3: This Mini-Interview asks for your sales form delivery Preferences.

The next page will display a message telling you that statements are ready to print, if you’ve chosen that option for any of your customers. If there is a problem with any emails that were dispatched, you’ll be notified on the QuickBooks Online home page.

Note: Statements are not new transactions. They simply report on transactions that have already occurred. Talk to us if you have any questions about which form to use in a given situation.

If you don’t like the look of your statements, you can customize them. Click the small wheel icon in the upper right corner and select Company Settings | Form Delivery | Customize Forms. To see the Preferences that relate solely to statements, go to Form Delivery | Statements.

The timing and frequency of statements are both important. Send too many, and you might confuse customers. As we said before, you don’t have to send statements at all. The Open Item statement, though, can be an element of your ongoing efforts to get paid faster and improve your critical cash flow.

Archive for the ‘QuickBookss Online’ Category:

Stretching QuickBooks Online: What You Can Do With Apps

If you do business outside of your office walls, you need remote access to QuickBooks Online. You can have it.

One of QuickBooks Online’s most compelling benefits is its portability. While its desktop counterparts remain chained to your desktop PC or notebook (with limited remote capabilities), many of the features found in browser-based QuickBooks Online can be easily accessed via iOS and Android smartphone and tablet apps.

These apps don’t look and work exactly like QuickBooks Online, and they don’t do absolutely everything you can do in the browser-based versions, but the most common accounting tasks you’d want to do away from the office are supported.

These mobile apps give you and your staff the freedom to manage numerous accounting tasks away from the office, whether you’re at home, a customer’s location, a conference or convention, or any event where you can sell products or services. You can, for example:

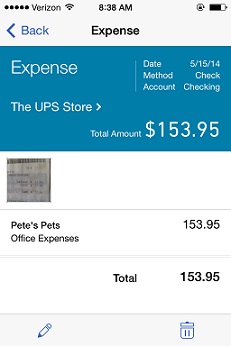
  • Enter expense data

QBO 0614 image 1

Figure 1: You can either snap a photo of a paper receipt or enter expense information manually on your smartphone or tablet.

  • Build new records for customers and vendors
  • Create invoices and estimates
  • Receive payments, and
  • Issue sales receipts

You can do all of that on a smartphone. The iPad version offers more, including reports and account registers.

Easy Operations

QuickBooks Online mobile apps take advantage of the capabilities of whatever device you’re using, so it’ll be easy to jump in and start using them by clicking on links or buttons, entering data or choosing from lists, and returning to previous screens when necessary. Their user interfaces and navigational tools are very similar.

Once you’ve downloaded and installed the free app, you’ll simply sign in using your QuickBooks Online user name and password. Your accounting files are then automatically synchronized with the mobile app, after which you can open the navigational menu, which appears in the left vertical pane.

The apps are arranged slightly differently, but they’re roughly comparable, the iPad version offering the most options, of course. They all have a link to an Activity screen, which is an audit trail of sorts. It displays transactions entered in QuickBooks Online on all devices.


QBO 0614 image 2

Figure 2: You can view transactions already entered in QuickBooks Online and create your own on your mobile device.

Simple Forms

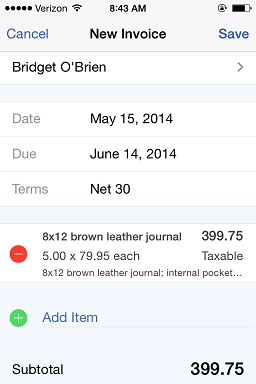
Say you’re working from home and you need to create a customer invoice. You’d click on that menu item, then on the “+” sign and fill out the form similarly to how you would back in the office. You’ll have access to your existing customer list and your database of products and services, or you can add your own. So you’d:

  • Select your customer from the list that opens
  • Change the dates, terms, sales tax status, discount and deposit if necessary
  • Choose products and/or services from the list and modify the quantity if necessary
  • Add a note or customer message if desired, and
  • Save the invoice.

All data that you enter, modify or delete is periodically synchronized; you can also refresh it manually.

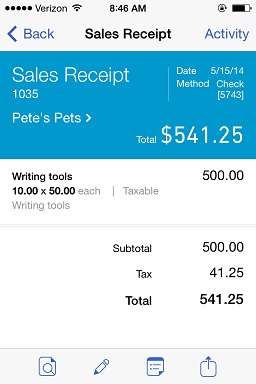
QuickBooks Online’s sales forms – invoices, estimates and sales receipts — all work similarly. You can record payments in the mobile apps, as well as expenses you incur outside of the office.


QBO 0614 image 3

Figure 3: If you sell products or services outside of the office, you can create sales receipts and offer to email copies to customers.

Of course, if you’ll be selling away from the office using one of QuickBooks Online’s mobile apps, you’ll want to be able to accept credit and debit cards. We can help you get set up with a merchant account that will allow you to do that. Remote payments are sent to QuickBooks Online, so your bookkeeping tasks will be greatly simplified.

If you use any kind of mobile device, there’s really no reason not to use a QuickBooks Online mobile app – unless you absolutely never work away from the office, never meet with customers at their sites, and never sell anything remotely. If you do any of those things ever, you’ll find that their convenience and flexibility can help you save time, manage your workflow better, and increase sales.